Category: Clothing

Veronese Suit: Hose and Imbusto

So obviously I decided to point the hose to an imbusto instead of to the doublet. I think this is going to be a good decision in the end, as I already have some other styles I want to make, and that means I can experiment without having to make a whole mess of eyelets for each one.

So, on to the hose:

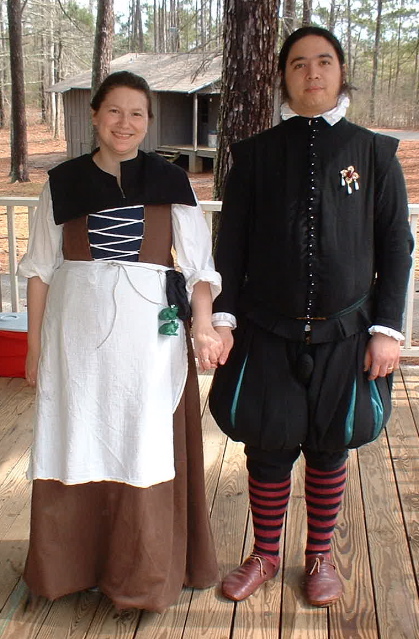
The hose are made from some nice stretchy wool with a kind of weird but inoffensive weave that I got for cheap on the interwebs somewhere. I’ve made 15c hose with it before and it worked fine. As usual, the hardest part of this was actually cutting the legs of the hose, but one I started it was no big deal. I used the same pattern I’d worked out from the blue linen hose for my last iteration of the Flemish peasant suit, with a little extra all around to play with. I ended up cutting off the height I’d added to the waistband, but better to have it available than not, I suppose.

The waistband and center front were reinforced with three layers of medium weight linen, and the waist was bound with a strip of the wool. I went for 7 pairs of eyelets on each leg, and I think I can get by with two pairs to close the center front.

The imbusto was originally an experiment for a 15c Burgundian suit that I never finished, which is just as well because I was doing it wrong. I went through a bunch of song and dance trying to get it to fit right and put the waist at the right level. I put a gusset in the back, then took that out and put in a full height panel, took it in at the shoulders to raise the waist, took off the skirt and sacrificed the original eyelets, added length back at the shoulders, and put in a whole new set of eyelets at the bottom. It still needs some finishing work, but I wanted to make sure the darn thing actually fit:


Obviously, I haven’t installed the codpiece yet, but I swear this is the most comfortable pair of hose I’ve ever made. I really need to rework the pattern to move the back seams, but as far as comfort and movement, the combination of pattern and material make me very happy. I may put a little dart in the top of the imbusto to bring the shoulders in if it really bothers me.

Veronese Suit: Beginning

I always enjoy getting out to events in other kingdoms, so I decided to make a trip to Atlantian Twelfth Night to see some friends and do some dancing. The theme is very specific: 1543 at the court of Henry VIII. I figure there were some Italians at court, so I went looking for something to wear.

I have had a love for these funky slashy collars for ages. They only show up for a brief time, and there aren’t a lot of good images, but there they are. You can also see it on Prince Henry in Ever After (not the most accurate costume ever, but clearly inspired by the style). I poked around for a while and decided to use as my primary reference the guy in the back of the dance circle in Veronese’s Outdoors Entertainment with Dancers (you can see him in the upper left portion of the image at left). There’s not a lot of detail available in the image, so I’m trying to make my best guess as to construction from some other sources, including Beham’s somewhat earlier and more German Portrait of a Man. There’s also some references and images for similar side-closing crossover type garments in Moda a Firenze (Cosimo). Armed with these resources, I forged ahead.

I went to the stash for fabric, and decided to use a lovely grey cotton velvet that I scored from a friend’s stash purge. I dug out some heavy red cotton that had been cut out for a tunic a million years ago and manged to squeeze out enough bits for interlinings. The lining is a thin red linen that is a massive pain to work with, wrinkles like mad, and is just not good for anything but linings.

Starting from the body block I made fairly recently, I cut up an old bed sheet to try to work out the pattern for this thing. I knew I wanted it to fasten at the left side, but I wasn’t entirely sure how far over the under layer should extend. I’m still a little undecided on that, but we’ll get there later. After mocking it up and tinkering some more with just the interlining, I went ahead and started the real construction.

I sewed together the outer shell of velvet and interlining, and tacked the seam allowances down inside to keep everything laying flat. I didn’t want to attempt putting an iron on the velvet, though I imagine it wouldn’t be too disastrous if I were careful. I cut the velvet with some extra at the neck and armscyes so I could turn it over the edge of the interlining and attach the lining there by hand. The rest of the edges were basted and then bound with a strip of the velvet.

The main body of the doublet is pretty much together now, minus some of the fastenings. I’ve got a hook and eye to secure the inner flap the the right shoulder, and hooks and eyes at the left shoulder. The left side will be closed with three points which will require working some more eyelets.

I’m still undecided on what to do as far as attaching the hose. You can’t see what’s going on at the waist on my primary reference, though the seated musician on the right side of the painting looks like he may have some visible points at the waist. I’m trying to figure out exactly how the points would work at the front of the doublet, and have yet to come up with anything entirely satisfactory. I’m contemplating making (actually recycling) an imbusto to go underneath just to have something to point the hose to. I think I’ll finish up the points on the doublet, make the hose, and then see what the best way to attach things will be.

Brueghel Jacket: Completed

Here is the jacket in person, along with the new linen kirtle underneath and a very old apron. I still need to make a new coif to go with it. The ensemble seemed to wear well. I think I may take the side panels out, reattach the sleeves so they aren’t puckered at the shoulder, and reset and trim down the side panels at the bottom. That should be easy enough to do.

Brueghel Jacket: Construction

One side of the jacket put together (front, side panel, back)

The left sleeve installed.

The basic concept seems to work fine, though the sleeve should probably have been much wider to match the painting. Still, it’s wide enough as it is. In fact, the sleeve was a bit wider than the arch of the armscye, so I opted to just ease it in rather than cut it down (since I’d already finished all the edges). Hopefully a little steam will smooth that out, and if it doesn’t I’m not too concerned about it. I also took it in about an inch and a half on each side with a tuck in the center of the side panels, to account for seam allowances that were in the pattern but didn’t happen in the final garment. I need to finish and install the other sleeve, and then it will be done, more or less. The plan is to do hooks and eyes up the front, but I may just pin it this weekend.

Brueghel Jacket: Source Images

I have plans to make myself some new clothes, but first I must make my lovely wife new clothes. I made her a Flemish peasant outfit once many years ago, and it seemed like time to try it again. I’d already done the combination of side-back laced kirtle and front laced overgown that everyone in the world has done, so I opted instead for a front laced kirtle and short jacket. There are a couple of examples in Brueghel’s Wedding Dance, conveniently showing similar jackets from the front and back:

This detail shows the seam lines in the back.

This image shows the front neckline.

I’ve always wanted to do something like this with a square sleeve head inserted into an arch-shaped armscye, so it should be interesting. I cut some rough rectangles that I thought would approximate the pattern pieces, then draped them on her while she was laced into the kirtle. I turned down the corners at the top to make the neckline, and took in the center back seam until it fit right, trying to keep all the pieces as simple as possible. The sleeve pattern is drafted from measurements.

I managed to cut all the pieces out of some black wool that used to be a cloak at some point, and cut the lining from some medium weight teal cotton that I’ve had for probably 15 years. I’m wrapping the wool around the edges of each piece and putting it all together by hand. Hopefully I’ll be able to get it done by this weekend when she needs to wear it…

Mary Rose Bracer: Prototype Finished

I finished up the bracer this afternoon:


Based on the straps on this example (also from the Mary Rose), I made my Y-shaped straps by splitting the ends of two straight straps. A few quick rivets and a Tandy buckle later, and I had a functional bracer. I also experimented with some basic tooling using a nail set. The leather was about as rigid as it was this morning, which means it will hold the right basic shape but still conform to my arm when strapped on. That’s good enough for me. I also sanded the inside some to smooth out the scratchy bits. It took me a few shots (and a lovely armor bite) to figure out exactly where on my arm it needed to be, but after that it performed its task admirably.

After I was done shooting for the night, Adela came out to give it a try. I may need a second bracer sooner than I thought…

Mary Rose Bracer: Beginning

As part of my new archery obsession, I have found myself in need of a bracer. The first time I tried out my new bow, I wore the arm harness from my armor, which did the job so well I didn’t even know it was doing it. Several people told me they didn’t shoot with a bracer at all, so the next time I tried going without. I proceeded to get smacked repeatedly in the wrist, which make me quickly reconsider this plan of action. I tried wrapping some scrap cloth around my wrist, which was effective but ugly and cumbersome. In the end I used a medical wrist brace, which did the job of protecting my arm, but made it a bit clumsy to hold the bow.

In the meantime, I was already starting on a better replacement. I’ve played with hardening leather in the past, so I got to work bodging together a prototype. My goal is to make something like the fancy bracer from the Mary Rose shipwreck, inspired by this excellent reproduction. I figured I would want it to be in the form of a tapered cone to match the shape of my forearm, so I searched around the house and managed to put something together out of a plastic cup and a cutting board:

Also pictured: the leather, a tub to soak it in, and a fancy marking tool.

I cut out a chunk of leather about the size of my soaking tub, just in case there was a lot of shrinkage. I stuck it in the tub and covered it with near-boiling water from the hot water dispenser at the sink (love that thing!):

I left it there for about 10 minutes (while I was out shooting in the back yard), then came back and secured it around my form with some junk fabric tied with strips of the same:

I wanted to avoid any bulges in the leather from being tied too tightly, and the cloth wrapping seemed to do the trick. I left it to dry overnight. In the morning, the leather was still a bit damp, but held the shape of the form.In the morning I removed the form and wrapping, and tied the leather back up to keep it from flattening back out. It then went in a 200° oven for about 20 minutes while I ate breakfast and got the kids ready to go:

Placed with the edges of the leather down in case the rack left any marks (it didn't)

At this point the leather was dry to the touch, and semi-rigid. I could bend it easily by hand, but it returned to its formed shape. It may harden up more as it finished drying, but this is sufficient for my purposes as it is. At this point I started to consider the pattern of the actual bracer. The extant one didn’t really seem tapered at all, and I wondered why that might be. After digging up some actual measurements of it, it seems it was only about 5″ long, so it only would have covered the wrist, not the entire forearm. On the down side, this meant I had cut far too much leather. On the up side, this meant I could make two or three out of the leather I had already hardened. I sketched out a quick paper pattern:

I laid the pattern on the formed leather and scored a line around it. I cut it out with leather shears, then beveled the edges with an X-acto knife. This is where I left it as of this morning:

I don’t plan to do much else with this aside from attaching the strap and maybe some sanding of the inside and edges to smooth them out a bit. I may make another from this piece of leather and try some tooling or painting on it, though tooling would have been best done while the leather was still wet. Now that I know there will only be minimal shrinkage from this hardening method, I can cut the piece to shape, tool it, and harden it for the next attempt.

Don Carlos Belt: Finished

I made the mold back out of a piece of scrap wood, with nails for registration pins. I needed to drill out the back for rivets on the loop terminals, and I decided to carve out the back side of the hook a little bit to give it some more thickness. To make sure everything lined up, I put a little acrylic paint on the front side of the mold, then pressed the two halves together to transfer it. It gave me enough of an idea of where the edges would line up so that I could put things in more or less the right spot. I poured up a few sets, but I started getting some discoloration in the metal (probably from impurities from the wood) so I only ended up with two usable sets of loops. I cut the old hardware off the belt and installed the new bits. So far, it looks like a winner!

(more…)