Category: 15th century

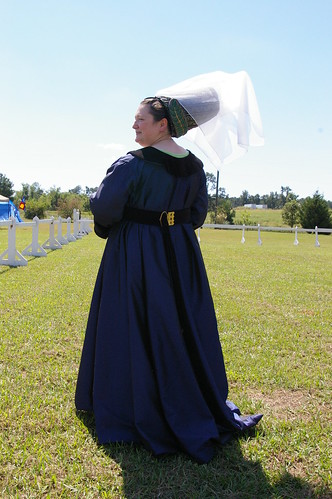
Van der Weyden Gown: Progress and Belt

I put together the first draft of the Van der Weyden gown a couple months back, but it got put on the back burner in favor of  my own Pennsic sewing. Now that the war is past, I’m getting busy on it again (since it needs to be done in three weeks!). I am indeed using the blue silk taffeta for the gown, backed with a couple of different medium-to-heavy plain fabrics. The first draft of the gown was a little skimpy at the hem, so today I ripped out the side seams and added some gores to provide plenty of yardage down below. The gown should be long enough to just brush the ground, with a bit of train in the back. Practicality is not a big consideration for this one. I had originally attached the sleeves by machine (which I was using for all the long seams of the gown), but I removed them and reinstalled them by hand, which gave an infinitely better fit. The sleeves are lined with thin white cotton, with an addition lining of black velveteen for the lower three-quarters of their length. The sleeves are long enough for a four or five inch turnback at the cuff. All I have left to do now is the collar, front seam, and hem.

Sadly, I don’t have any pictures of the gown yet, but I do have one of the belt. It’s made of the same black velveteen on both sides, with a core of heavy wool stitched to a layer of cotton/linen to hold it in place. The buckle I picked up at war from Thorthor’s Hammer, and the buckle plate is made from a piece of sheet brass. The belt is 2.5″ wide and about 65″ long. It will get a matching brass end soon.

Van der Weyden Gown: Planning

I’m not quite ready to start on it yet, but I have some ideas about the gown for this project. I think I want to do something like this:

Click!

Isabella of Portugal, a copy c. 1500 of a portrait executed by van der Weyden before 1451

I plan to make the gown from the blue silk taffeta that I used for my Bronzino suit, with black velvet for the collar and cuffs. I like this gown because it has nice unstructured pleats and wide sleeves that should make it easy to wear. I’ll need to back the taffeta with something heavier to give it some body, I’m sure.

As for the hat, I think I’ll try something more like this one:

Rogier van der Weyden, Portrait of a Lady c. 1455


Van der Weyden Kirtle: Skirt

Looking at the skirt in the painting, my first plan was to make a nice circle skirt with no pleats at the waistline. I cut a couple skirt length chunks of the linen, cut each of those up into four gores, French seamed it all together (on the machine!) and slapped it onto the bodice. I ended up with a few small pleats in the back, but I figured that would be fine.
It was not enough skirt. Nowhere near enough. Not much hem, didn’t fit well at the waist, and altogether terrible. I undid the waist seam and the center front seam (no French seam there, since it was two selvedge edges), cut another length of linen, divided into two mostly-rectangular trapezoids, and added it into the front of the skirt. I reattached it to the waist so the new section was pleated into the front half of the bodice, and the original gored part of the skirt all went in the back. I haven’t gotten a chance to try it on her yet, but it should fit just fine.
Can I justify the pleats? There are some pleats in the back of kirtles depicted by van der Weyden (like this one), and pleating all the way around the waist in this fairly contemporary painting by Hugo van der Goes. It’s not the ideal solution, but I think it’ll be sufficient.

Van der Weyden Kirtle: Bodice Finished

After adjusting the armscye, I attached the neckline facing:

I basted the facing in at the top and bottom (with the edge turned under), then used the bottom row of basting stitches as a guide to topstitch the facing from the front. I used a back stitch with  two strands of cotton embroidery floss.

Next, I used the machine to attach the binding from the front and then hand sewed it down on the inside. After a pile of eyelets, the bodice was finished:


Here you can see the shoulder seams:


The neckline sits a little funny, especially in this spot, though it’s hard to see in this picture. I’m not going to mess with it until I get the sleeves and skirt on, and see if it works itself out.

Van der Weyden Kirtle: Bodice

Ah, I’ve forgotten how nice an all-night sewing binge can be! I was up until 1 AM, but I got the bodice mostly put together. I decided to use the construction technique that can be seen in van der Weyden’s St. John altarpiece, with the back and shoulder seams finished on the inside. This should allow for easier alteration in the future. The layers used in the bodice are a light green linen (which might be cotton/linen), an interlining of the medium weight blue cotton/linen I’ve been using for ages now, and a lining of lightweight white linen.

First phase of construction

One of my goals with this dress is to re-integrate some machine sewing into my technique. I used the machine to sew up the side seams, and to zig-zag on a couple extra layers of the interlining at the center front edge to reinforce the eyelets. The lining and interlining are cut to the same shape, while the green linen was cut a little larger at the seams and the armscye and waist edges. You can see here where the green linen has been turned under and sewn down at the armscye and waist. The remaining edges are hand-basted to keep them together.

Front shoulder seam complete

Here the first shoulder seam has been finished. The main seam was sewn by machine, and then the edges were sewn down by hand, with the green linen turned over the edge of the linings.

Both shoulder seams sewn (and altered)

Here both shoulder seams are complete, and you can see part of the neckline facing basted in place. I did a test fit of the bodice after finishing the main seams, and found that the armscye was too big at the front. I marked where the seam needed to be adjusted, and altered the seam without any fuss. The construction technique seems to live up to its potential.

There really wasn’t a whole lot of machine sewing that I was able to do using this method. I ended up having to reinforce a couple of the seams by hand, as they were already starting to come apart while I was finishing them. I think I’ll still use the machine on the skirt seams, but I don’t know if I trust it for bodice seams that will be under real stress.

Van der Weyden Kirtle: Beginning

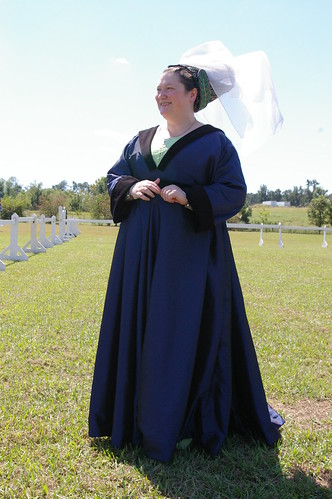
I’ve finally started on Adela’s new clothes: a 15th century Flemish kirtle and gown suitable for fancy occasions. The kirtle is based on the ones shown in various paintings by Rogier van der Weyden, like this one:

It has short sleeves, with distinctive seam lines at the front and back of the shoulder. Some examples have another seam at the top of the shoulder as well. While in some cases it looks like it might be a raglan sleeve, you can see here a short set-in sleeve. There is also a seam line parallel to the neckline, as well as what looks like a binding at the neckline edge itself. I’ve got some theories about this that I’ll be putting into practice as this progresses.

ETA:

Here’s the pattern:

When I worked the pattern out, I put the shoulder seam in. I’m not sure if it will make any difference; I may go ahead and edit it out when I make the real thing.