Tag: 15c

Smooth Move

After all the trimming, filing, and drilling, the buttons still had some rough spots and edges, and I didn’t want to spend a million years trying to find them all and polish them. Instead, I tied the buttons up into four bunches with hemp cord, stuck them in a sock, and ran the whole thing through the dryer. They came out shiny and smooth, with all the detail on the button faces still intact. Lacking a dedicated tumbler, this seems to be the next best thing.

Also, a picture of the large buttons:

Doing The Work Up Front

I’ve been finishing a big pile of buttons, and I’ve decided that I need to make some serious design changes next time I make them.

  1. While the fabricated shanks seem to be historically plausible, they’re a giant pain to do. I think I’ll make another mold back with integral button loops. It’ll be fiddly to make, but worth it for all the finishing time it’ll save.
  2. I need to make the buttons thicker so they can have wider edges. Finishing the thin edges is annoying. Making things too thin is nothing new for me; I really need to stop it.

Buttons!

I promised to give a set of pewter buttons to the winner of the 15th century category of my Sharp Dressed Man contest, but I hadn’t ever gotten around to figuring out how to make them. I looked at some extant buttons, and it looks like many of them have flattened shanks with drilled holes rather than shanks cast as loops. This meant that I could use the same mold for integral rivet belt mounts and buttons. I made a button face mold out of a little scrap of soapstone, and gave it a shot. One of the mold cavities didn’t quite line up with the shank right, but the other one hit dead center. I mashed the shank flat with vise grips, drilled the hole, et voila!

Field Tests

I mourn for all the years I wasted not wearing wool hose. These were by far the best hose I’ve ever worn. They fit so well that I hardly ever thought about them, were only hot when I was sitting in the blazing sun, and looked great. Aside from the inevitable wrinkles at the ankles, there was no bagging or sagging anywhere, even after a long day of wear. I think I’ll cut the next pair a bit higher in the crotch, but that’s about all I can think of. I put a doubled linen facing at the waist (and accidentally in the crotch curve, but that’s another story), which made a nice sturdy place to put in the eyelets.

As for the brache, they seemed to perform well, aside from a couple of seams blowing out. I think they may be a touch small, so the next pair will get an extra couple inches in each leg. Otherwise, no complaints.

Dreamstone was a lovely event, composed primarily of hanging out with friends and occasionally dropping in for field-side classes. The weather was beautiful.

New Projects

This past weekend I showed Philippa how to do pewter casting, and she made a whole pile of bling for her Eleanora de Toledo gown. I’m looking forward to seeing how the rough castings turn out once they’re all assembled.

All of my old brache (linen drawers) have been wearing out, so I decided I needed to make some more. I’d been using a pattern with two tubular legs and a strip that went all the way through the middle from front to back. It works well enough, but tends to wear through at the top of the inner thigh. This time I switched to a square gusset in the crotch, and so far it seems comfortable enough, with less bulk at the waist. This weekend will be the test to see how it works in real life. I have high hopes.

I also finally started a pair of wool hose. I have some tropical weight worsted wool suiting that I bought at least a year ago from fabric.com. It’s very light and drapey, and I’ve been putting off using it for far too long. I cut out the legs (on the bias, of course) using my trusty old hose pattern, sewed up the back seam, and pinned them on to an old doublet. I am ashamed at how long it’s taken me to try this, as they look, feel, and fit wonderfully. We’ll see if that remains true once I get the feet and lacing holes in, but I suspect these will be my favorite hose. One step closer to a decent pair of full hose…

Van der Weyden Kirtle: Bodice Finished

After adjusting the armscye, I attached the neckline facing:

I basted the facing in at the top and bottom (with the edge turned under), then used the bottom row of basting stitches as a guide to topstitch the facing from the front. I used a back stitch with  two strands of cotton embroidery floss.

Next, I used the machine to attach the binding from the front and then hand sewed it down on the inside. After a pile of eyelets, the bodice was finished:


Here you can see the shoulder seams:


The neckline sits a little funny, especially in this spot, though it’s hard to see in this picture. I’m not going to mess with it until I get the sleeves and skirt on, and see if it works itself out.

Van der Weyden Kirtle: Bodice

Ah, I’ve forgotten how nice an all-night sewing binge can be! I was up until 1 AM, but I got the bodice mostly put together. I decided to use the construction technique that can be seen in van der Weyden’s St. John altarpiece, with the back and shoulder seams finished on the inside. This should allow for easier alteration in the future. The layers used in the bodice are a light green linen (which might be cotton/linen), an interlining of the medium weight blue cotton/linen I’ve been using for ages now, and a lining of lightweight white linen.

First phase of construction

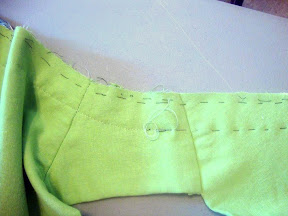
One of my goals with this dress is to re-integrate some machine sewing into my technique. I used the machine to sew up the side seams, and to zig-zag on a couple extra layers of the interlining at the center front edge to reinforce the eyelets. The lining and interlining are cut to the same shape, while the green linen was cut a little larger at the seams and the armscye and waist edges. You can see here where the green linen has been turned under and sewn down at the armscye and waist. The remaining edges are hand-basted to keep them together.

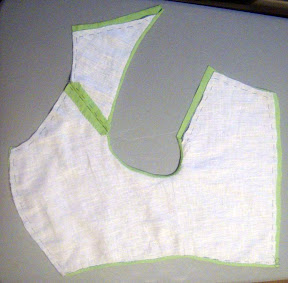
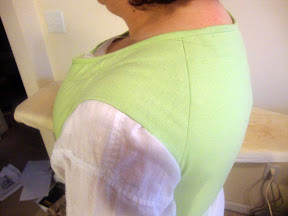
Front shoulder seam complete

Here the first shoulder seam has been finished. The main seam was sewn by machine, and then the edges were sewn down by hand, with the green linen turned over the edge of the linings.

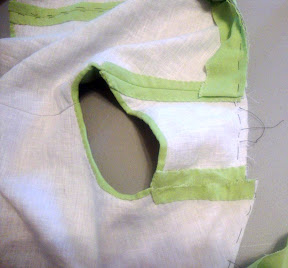
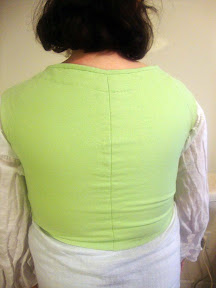
Both shoulder seams sewn (and altered)

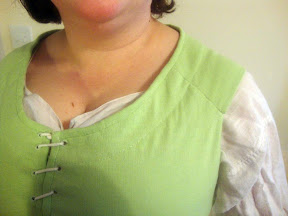
Here both shoulder seams are complete, and you can see part of the neckline facing basted in place. I did a test fit of the bodice after finishing the main seams, and found that the armscye was too big at the front. I marked where the seam needed to be adjusted, and altered the seam without any fuss. The construction technique seems to live up to its potential.

There really wasn’t a whole lot of machine sewing that I was able to do using this method. I ended up having to reinforce a couple of the seams by hand, as they were already starting to come apart while I was finishing them. I think I’ll still use the machine on the skirt seams, but I don’t know if I trust it for bodice seams that will be under real stress.

Van der Weyden Kirtle: Beginning

I’ve finally started on Adela’s new clothes: a 15th century Flemish kirtle and gown suitable for fancy occasions. The kirtle is based on the ones shown in various paintings by Rogier van der Weyden, like this one:

It has short sleeves, with distinctive seam lines at the front and back of the shoulder. Some examples have another seam at the top of the shoulder as well. While in some cases it looks like it might be a raglan sleeve, you can see here a short set-in sleeve. There is also a seam line parallel to the neckline, as well as what looks like a binding at the neckline edge itself. I’ve got some theories about this that I’ll be putting into practice as this progresses.

ETA:

Here’s the pattern:

When I worked the pattern out, I put the shoulder seam in. I’m not sure if it will make any difference; I may go ahead and edit it out when I make the real thing.