
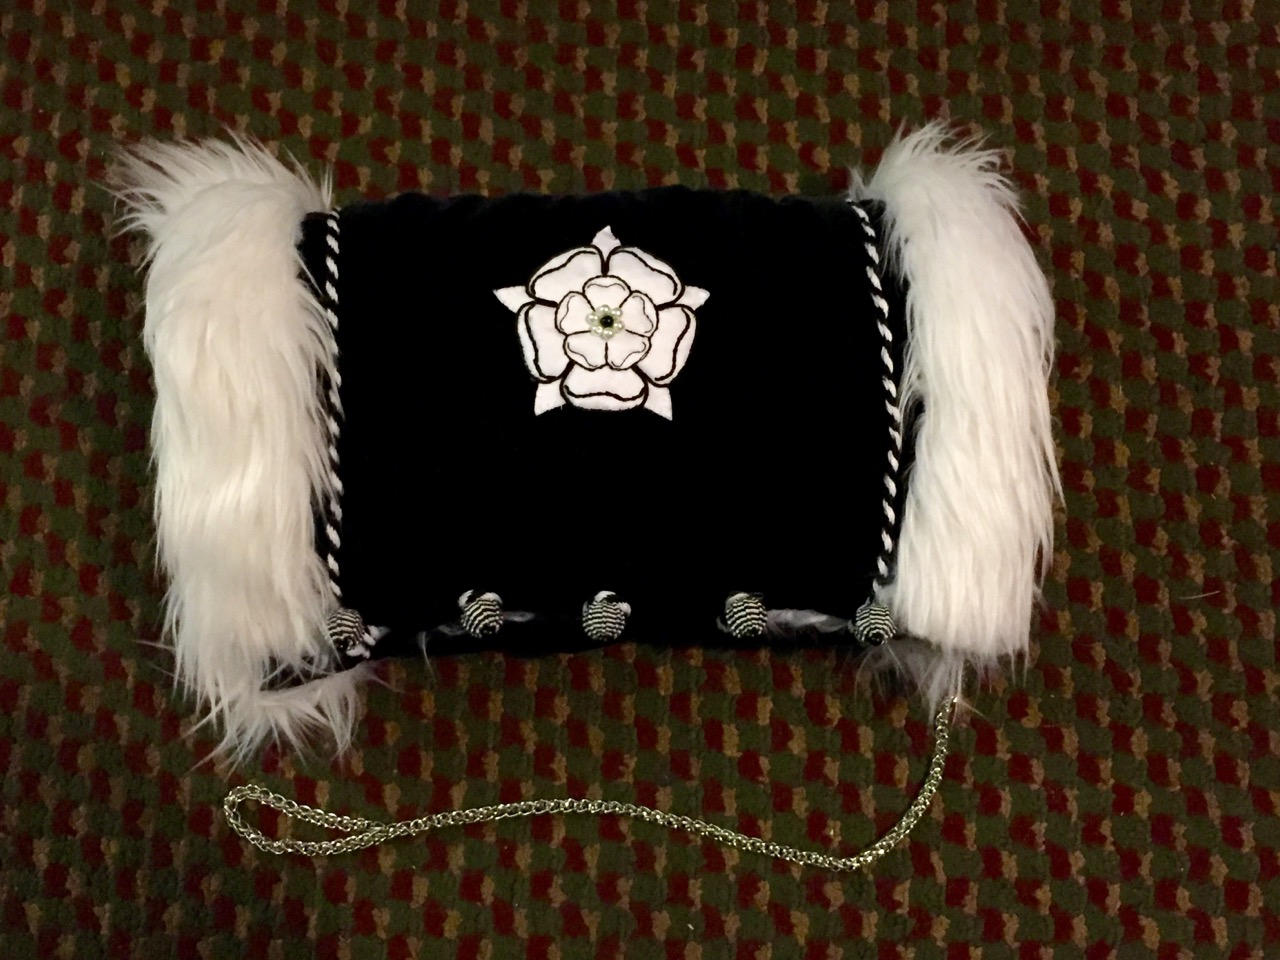
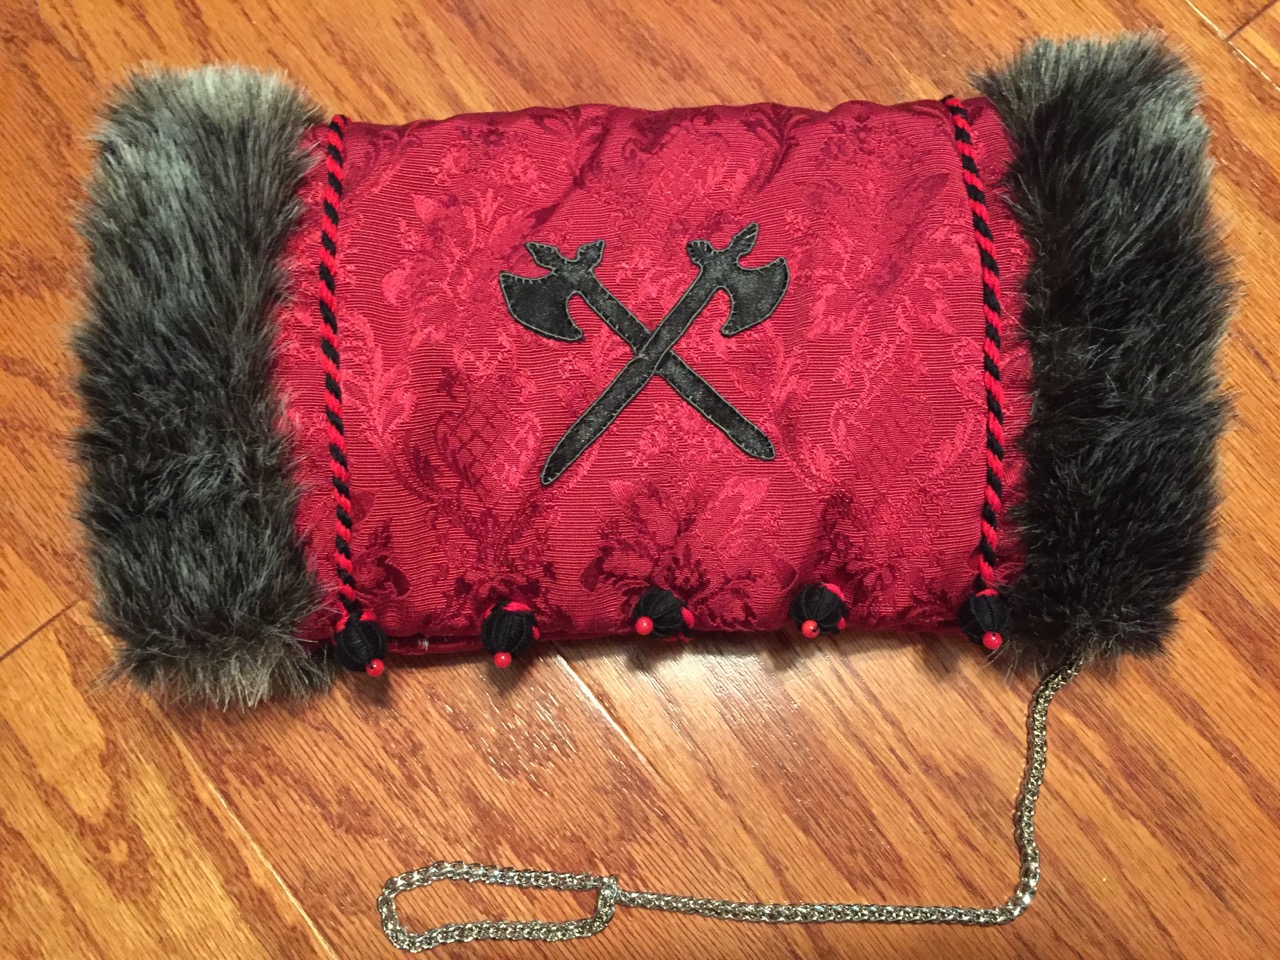
 On the occasion of the investiture of Bjorn and Genevieve as Baron and Baroness of Iron Mountain, I decided to make a fur muff as a gift for Her Excellency. For good measure, I made a pair of matching muffs for the Queen and Princess as well. Most of the materials came from my stash, except for the beads for the buttons and the chains and the satin for the appliques. The red muff is a damask of unknown fiber content, interlined with two layers of polar fleece and lined and trimmed with fake fur. The cords are fingerlooped from cotton crochet yarn, which was also used to make the thread wrapped buttons. The applique is polyester satin glued to a paper backing and outlined in couched cord. The black and white muff is made from similar materials an in a similar fashion, except for the shell being made of velvet and the applique involving some extra chain stitch, back stitch, and beads in the center. This was not a very deeply researched project, but it was pretty satisfying for being done on relatively short notice. Stella, Serafina, Veronica, and Sefa helped with many aspects of the construction.
Category: Accessories
Veronese Suit: Pouch
The jerkin is just about done, but I took a little break to make myself a pouch. I’ve been wanting one of these ever since I saw Purses in Pieces. I didn’t want to carry around my big pilgrim’s scrip, and I didn’t really have a decent belt pouch. Everything here came from my stash. The outside is leather recycled from a friend’s couch reupholstering project, and the inside is pigskin left over from bookbinding. I have no idea where the buckle came from. The side seams were done on the machine, and the center seam was sewn with a strip of the pigskin. It took me a while to figure out how to get all the holes lined up through all the layers, but then I realized I could clamp it down with some scrap wood. It only took a few hours to put the whole thing together. Of course this is a relatively simple example with no pouchlets, but it should do.
Relief For Bruised Fingers
I had assumed that the archer’s finger tab was a modern invention, but I was pleasantly surprised to find out that I was wrong. I cut one out of the thick, stretchy elk hide I’ve had for years that’s not good for much else, and it seems to work as advertised. No more shooting until I finish getting packed for Saltare, though!

Mary Rose Bracer: Prototype Finished
I finished up the bracer this afternoon:


Based on the straps on this example (also from the Mary Rose), I made my Y-shaped straps by splitting the ends of two straight straps. A few quick rivets and a Tandy buckle later, and I had a functional bracer. I also experimented with some basic tooling using a nail set. The leather was about as rigid as it was this morning, which means it will hold the right basic shape but still conform to my arm when strapped on. That’s good enough for me. I also sanded the inside some to smooth out the scratchy bits. It took me a few shots (and a lovely armor bite) to figure out exactly where on my arm it needed to be, but after that it performed its task admirably.
After I was done shooting for the night, Adela came out to give it a try. I may need a second bracer sooner than I thought…
Mary Rose Bracer: Beginning
As part of my new archery obsession, I have found myself in need of a bracer. The first time I tried out my new bow, I wore the arm harness from my armor, which did the job so well I didn’t even know it was doing it. Several people told me they didn’t shoot with a bracer at all, so the next time I tried going without. I proceeded to get smacked repeatedly in the wrist, which make me quickly reconsider this plan of action. I tried wrapping some scrap cloth around my wrist, which was effective but ugly and cumbersome. In the end I used a medical wrist brace, which did the job of protecting my arm, but made it a bit clumsy to hold the bow.
In the meantime, I was already starting on a better replacement. I’ve played with hardening leather in the past, so I got to work bodging together a prototype. My goal is to make something like the fancy bracer from the Mary Rose shipwreck, inspired by this excellent reproduction. I figured I would want it to be in the form of a tapered cone to match the shape of my forearm, so I searched around the house and managed to put something together out of a plastic cup and a cutting board:

Also pictured: the leather, a tub to soak it in, and a fancy marking tool.
I cut out a chunk of leather about the size of my soaking tub, just in case there was a lot of shrinkage. I stuck it in the tub and covered it with near-boiling water from the hot water dispenser at the sink (love that thing!):

I left it there for about 10 minutes (while I was out shooting in the back yard), then came back and secured it around my form with some junk fabric tied with strips of the same:

I wanted to avoid any bulges in the leather from being tied too tightly, and the cloth wrapping seemed to do the trick. I left it to dry overnight. In the morning, the leather was still a bit damp, but held the shape of the form.In the morning I removed the form and wrapping, and tied the leather back up to keep it from flattening back out. It then went in a 200° oven for about 20 minutes while I ate breakfast and got the kids ready to go:

Placed with the edges of the leather down in case the rack left any marks (it didn't)
At this point the leather was dry to the touch, and semi-rigid. I could bend it easily by hand, but it returned to its formed shape. It may harden up more as it finished drying, but this is sufficient for my purposes as it is. At this point I started to consider the pattern of the actual bracer. The extant one didn’t really seem tapered at all, and I wondered why that might be. After digging up some actual measurements of it, it seems it was only about 5″ long, so it only would have covered the wrist, not the entire forearm. On the down side, this meant I had cut far too much leather. On the up side, this meant I could make two or three out of the leather I had already hardened. I sketched out a quick paper pattern:

I laid the pattern on the formed leather and scored a line around it. I cut it out with leather shears, then beveled the edges with an X-acto knife. This is where I left it as of this morning:


I don’t plan to do much else with this aside from attaching the strap and maybe some sanding of the inside and edges to smooth them out a bit. I may make another from this piece of leather and try some tooling or painting on it, though tooling would have been best done while the leather was still wet. Now that I know there will only be minimal shrinkage from this hardening method, I can cut the piece to shape, tool it, and harden it for the next attempt.
Don Carlos Belt: Finished
I made the mold back out of a piece of scrap wood, with nails for registration pins. I needed to drill out the back for rivets on the loop terminals, and I decided to carve out the back side of the hook a little bit to give it some more thickness. To make sure everything lined up, I put a little acrylic paint on the front side of the mold, then pressed the two halves together to transfer it. It gave me enough of an idea of where the edges would line up so that I could put things in more or less the right spot. I poured up a few sets, but I started getting some discoloration in the metal (probably from impurities from the wood) so I only ended up with two usable sets of loops. I cut the old hardware off the belt and installed the new bits. So far, it looks like a winner!
Don Carlos Belt: Mold
After goofing on my first try at a new belt buckle, I decided to go back to the portraits. After looking through a bunch of images, I decided to rip off Don Carlos:

I’ve got the front of the mold carved. I need to make a back with rivets for the loop and then it’ll be time to pour some metal.

Owl Face Belt Hook: Research Fail
After making the loops for my new belt clasp, I went looking for options for the S-hook that were not snakes or swans. In the process, I ran across this link that pretty much blows a hole in the idea that the lion head belt terminals I found are actually 16th century. They seem to be more of the 18th century military belt clasp type. I’m going back through 16th century portraits now, and so far all I’m finding are surface-mounted terminals like I used on my old belt. I’m also less sure now about the zoomorphic decoration on the hooks for 16th century belts, but I think that will stand up in the end.
Edited to add: I managed to find a few examples that were clear enough to see what’s going on with the clasp. Surface mounted loops, as I expected, but also no clear evidence of the zoomorphic S-hook. There was more variety than I expected, and less surface decoration on the hooks, so that may be a blessing in disguise, from a casting standpoint. There seem to be both S-shaped hooks and sort of curvy M-shaped hooks as well…
Owl Face Belt Hook: Casting the Loops
I needed to make a new belt to go with the Alborghetti suit, so I found a new type of belt hardware to play with. Serafina came down today to work on some of her casting, so I cranked out a quick mold that I thought might do the trick. The extant piece I’m emulating has a lion face, with a perpendicular loop on one side for the belt hook and a wide rectangular loop on the other for the belt. Rather than make two molds for the two different belt loops, I tried to make a single mold that could be turned into either one. The owl face is from the household badge.
Van der Weyden Gown: Progress and Belt
I put together the first draft of the Van der Weyden gown a couple months back, but it got put on the back burner in favor of my own Pennsic sewing. Now that the war is past, I’m getting busy on it again (since it needs to be done in three weeks!). I am indeed using the blue silk taffeta for the gown, backed with a couple of different medium-to-heavy plain fabrics. The first draft of the gown was a little skimpy at the hem, so today I ripped out the side seams and added some gores to provide plenty of yardage down below. The gown should be long enough to just brush the ground, with a bit of train in the back. Practicality is not a big consideration for this one. I had originally attached the sleeves by machine (which I was using for all the long seams of the gown), but I removed them and reinstalled them by hand, which gave an infinitely better fit. The sleeves are lined with thin white cotton, with an addition lining of black velveteen for the lower three-quarters of their length. The sleeves are long enough for a four or five inch turnback at the cuff. All I have left to do now is the collar, front seam, and hem.
Sadly, I don’t have any pictures of the gown yet, but I do have one of the belt. It’s made of the same black velveteen on both sides, with a core of heavy wool stitched to a layer of cotton/linen to hold it in place. The buckle I picked up at war from Thorthor’s Hammer, and the buckle plate is made from a piece of sheet brass. The belt is 2.5″ wide and about 65″ long. It will get a matching brass end soon.
