
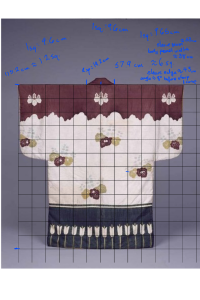
Today on a Discord server I’m part of, I was discussing extant examples of the period Japanese garment dobuku (a jacket) with some other members. One of them expressed that they would like to know the neck opening size of a particular garment in the collection of the Kyoto National Museum (link). While the museum has length and sleeve length listed, they don’t have the neck opening size. Inspired by the grid technique to enlarge or shrink an image when hand-copying it, I decided to try putting a grid over the image of the dobuku to see if I could get an estimate. This image shows the grid and annotations for my estimation process (resulting in a neck opening estimate of 14.2 cm).
After checking with a few people to see if they thought a post discussing this process would be valuable, I decided to repeat the process more clearly (and in less of a rush) with another Japanese garment (this one a kosode). This one is also in the collection of the Kyoto National Museum (link). In order to estimate the measurements of a garment from an image, you need an image with at least one measurement specified. Ideally, in my view, this would be the measurement for the top of the garment. (Since garments are usually photographed with the camera closer to the top than to the bottom, the likely amount of skew in an image of a garment is lower at the top than at the bottom.) I have not yet tried this technique on non-rectangular construction garments, but I suspect it is more difficult on them due to the nature of how such garments are displayed for photographs. That is, this works so well for these garments because they are displayed so that the back is flat (presumably on some sort of rectangular frame).
After you have acquired your image (you can crop or resize it, but make sure to keep the proportions intact or this will all be pointless), you need to put a grid overlay on it. I did this using a transparent grid image file I downloaded from a website, but you can do this using a physical image and grid transparency (or a ruler, a measuring square, and dedication) as well. It will just mean that you need a grid of known square size (most graph paper is a quarter inch, for example) and then multiply the number of squares by whatever factor will get you the actual measurement. If you are doing this electronically, however, you can adjust the size of your squares to fit your image (which is precisely what I did to make my life easier). Once you have put the grid over your image, you simply use the known measurement/s to estimate the size of your squares and thereby your unspecified measurements.
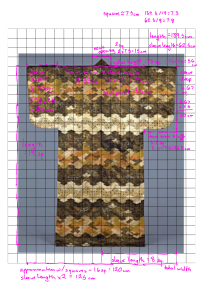
As you can see from this image, I checked the size of my squares against the sleeve length measurement (measured from the center back seam to the sleeve opening) and against the length. The sleeve length measurement suggested my squares were 7.8 inches on a side (62.5 cm divided by 8 squares) and the length measurement suggested my squares were 7.3 inches on a side (139.5 cm divided by 19 squares). The measurements are necessarily approximate (especially the length), so I settled on 7.5 cm as my estimate because it was between the two and made usefully round numbers (more on this later).
To check the drop of the sleeve, the width of the neck opening, the height of the collar, and the length of the sleeve from seam to edge, I simply counted squares (including estimated fractions as needed) to get approximate lengths on all of these measurements. Interestingly, measuring the left and right sleeves got me slightly different lengths (3.33 squares and 3.5 squares respectively), generating length estimates of 25 cm and 26.3 cm respectively. While this is not a huge difference, it marks a major drawback of this method (in that estimation depends mostly on your own judgment of squares and fractions thereof). To check my math, I multiplied the sleeve length given by the museum by 2 and got 125 cm for the sleeve edge to sleeve edge measurement. Multiplying 16 squares by 7.5 cm got me an estimate of 120 cm. A 5 cm difference is not terrible, but not ideal for the estimation. However, the math does indicate that I should probably have used the 7.8 cm per square measurement, as multiplying 16 squares by 7.8 cm gets me an estimate of 124.8 cm (only a 2 mm difference from the actual measurement).
I also checked my math by estimating the width of each back panel, however. Measuring between the two sleeve seams got me an estimate of 70 cm (with my 7.5 cm per square estimate), which gave me an estimate of 35 cm for each back panel. Using a 7.8 cm per square estimate, this ends up at 36.4 cm. Assuming a seam allowance of 1-2 cm at each seam (2 per panel), the width of each panel would be 38.4-40.4 cm. Since period Japanese fabric was 40-50 cm wide, this seems relatively reasonable (if narrow). Finally, to estimate the width of each panel a different way, I estimated the proportion of the sleeve length (seam to edge) to back panel width in squares, arriving at 7.14. Multiplying this by two (to account for both sleeves) got me 1.428 back panel widths for sleeves, so a total of 3.428 back panel widths from sleeve edge to sleeve edge. Dividing 125 cm by 3.428 back panel widths got me a panel width estimate of 36.46, aligning neatly with my earlier estimate.
Overall, while not a perfect substitute for measuring actual garments, this provides a reasonable estimate for measurements that are unavailable. Given how small the numbers are and how much they are multiplied, however, it is easy for small misestimates or adjustments for rounding to make a significant difference in the final result. Estimate with caution!