
 Upon looking at all of my garb, I noticed a decided lack of Meridian colors. This was especially obvious when I was doing entourage for their Majesties Thomas and Elisenda a few reigns ago. I never had anything in black or white because I’m always drawn to very bright colors when choosing garb.
Seperately from this, I had noticed an interesting picture of Eleonora of Toledo in the book Moda a Firenze (My favorite book of inspiration!). It was a portrait that I hadn’t seen before and featured a long, loose gown over a kirtle with quite a bit of trim. The portrait was a copy of another portrait of Bronzino. I rushed to put a book of Bronzino’s paintings on my Amazon wish list. The next Christmas, I got the Bronzino book and there was a beautiful reproduction of the painting. I don’t know what struck me about the painting; perhaps it was that the copy was full length and I could see the trim at the bottom of the dress, perhaps it was because it was an Eleonora picture I’d never seen/noticed before. Whatever the case, I decided that the gown should be on my short list of “Things I want to Make.”
At some point it occurred to me that the gown was black and on closer inspection it had white lining. This could be my Meridian Gown! So I decided to set about acquiring materials for the gown.
To make this ensemble properly I will need:
- The Petticoat/Kirtle
- The loose gown
- A new chemise with, while I’m dreaming, blackwork cuffs and neckline
- A partlet
- Jewelry:
- A big ol’ pearl necklace
- Earrings
- Girdle
- A drillion yards of trim and buttons/clasps
Over time I’ve managed to collect most everything I need for the outfit. I still need pearls, but they go on close to the end, so I will worry about that later.
The Kirtle
The first piece I wanted to work on was the kirtle. I got six yards of black brocade on the clearance rack at Fabric and Fringe Wearhouse, an awesome shop just down the street from my house, for about $5 a yard. I felt like this was a pretty good deal and have had the fabric for quite some time before this project actually got rolling.
 Lorenzo made me promise to draft my own pattern so he came over and helped me make a body block and turn that body block into a pattern. After making a muslin and fitting a refitting a few times I cut my fashion fabric (insert dramatic music here…). Lorenzo also made me promise to at least sew the bodice by hand. The front piece has four layers: The lining, canvas for stability, cotton batting to alleviate wrinkles, and the fashion fabric on top. To the left is a picture of the canvas and fashion fabric basted together. If you look closely, you can see where I’ve stitched down the cotton batting, but I didn’t think to take a picture of that.
After sewing the cotton batting to the canvas and basting on the fashion fabric it was time to start the real sewing. I tucked the edges of the black fabric around the canvas and sewed it down. The I took the lining-pink linen-and turned the edged under and sewed it to the back of everything. It actually looks really nice. Unfortunately, when I went to officially try it on, it was about 2″ too big. If I leave it as is, the lacing won’t work. Grrr. I’m putting the whole thing down for a few days to relieve frustration. I’m afraid if

I just take the inches out of the sides, the arm hole with be too small, but I also can’t take it out of the front because then the neckline will be too narrow (the seam would be covered up by trim, so that really isn’t a worry).
There was then quite a debate over how to recreate the trim on the front of the dress. After some careful studying of Janet Arnold and a lot of back and forth with Lorenzo, we decided the best course of action was to try to find another fabric to piece on top as the trim. In Patterns of Fashion many of the trims are clearly bought and added on later; some of them have clear piecing lines or awkward spots where the embroidery ends abruptly or strangely. I briefly considered using appliqué to get the pattern on, but gave that up as sheer madness. I went to a whole bunch of fabric stores and ended up with a  black silk fabric with a leafy gold design embroidered on it. It doesn’t exactly match the embroidery on the dress, but it is a nice approximation. I knew something needed to go into the middle of the embroidery because it was too sparse by itself. I was debating what to do, when I took a class at an event on period appliqué. Mistress Jadi, who taught the class, also taught us how to do gold couching. And Voila! I had the answer to what was going to go into the middle of the embroidery. I believe there is couching on the original dress and it is pretty easy and fast to do, now that I know how to do it. (Plus, it is something I’ve wanted to do for ages).
So this is currently where the kirtle stands.
The Overgown
I haven’t even really started the overgown. I currently own 7 yards of black velveteen, 7 yards of white satin, 50 yards of jacquard ribbon, and 90 yards of gold lace all of which will magically become the overgown. I got the ribbon and the lace from cheeptrims.com.
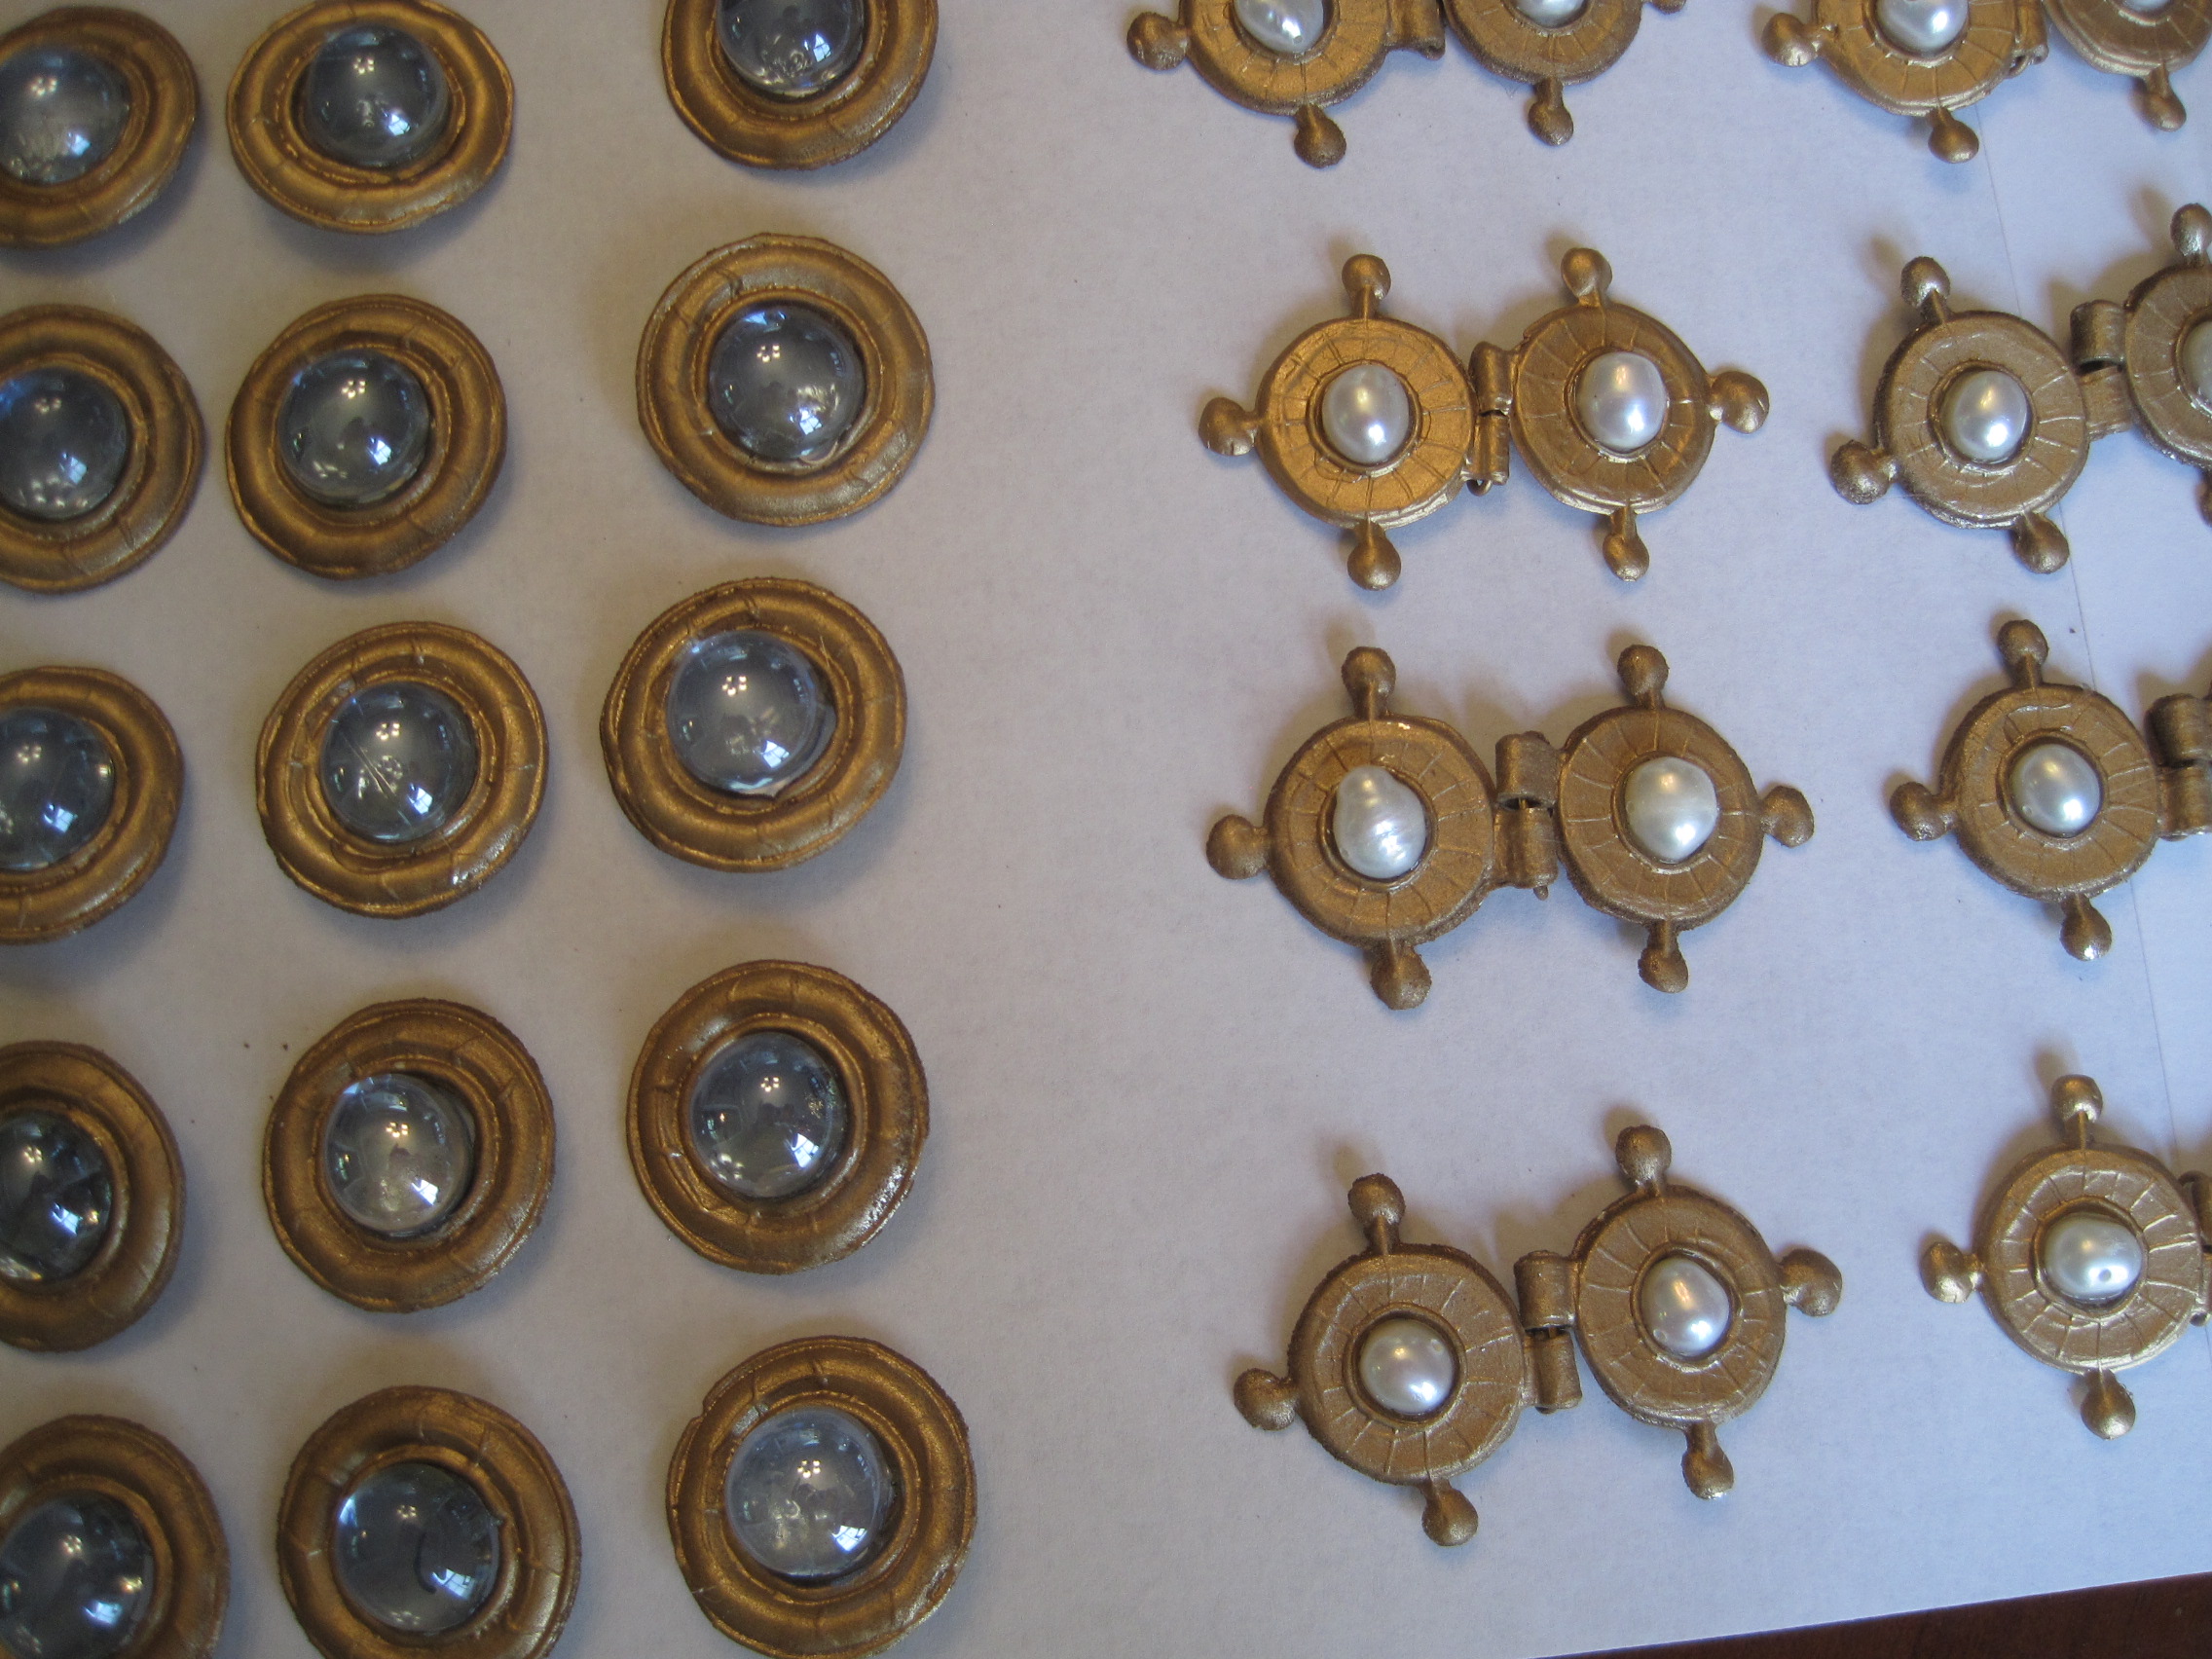
The overgown was problematic in that I needed about 100 smallish buttons and about 30 large buttons for the dress. The buttons are very prominent, they hold the paneled sleeves together…I needed about 40 per sleeve and they decorate the collar…about 20 more and the large buttons are all the way down the front of the dress to the floor. On further investigation, I decided the buttons on the sleeves were actually hinges. I couldn’t really find anything that was even remotely close or even remotely affordable. I was again stumped until Lorenzo mentioned that he was doing some pewter casting. I asked him if he thought we could make them out of pewter and he said sure! So I headed down south and learned how to cast pewter:
 Here I am at Lorenzo’s house casting pewter for the first time. It was really fun to do and not as hard as one would think…especially since Lorenzo had all the cool stuff to make it with! Once we carved the mold to the shape and got it heated up enough with enough air vents that the pewter flowed well, it was easy to make a million little hinges and buttons.
 And here are the Hinges and buttons:
")
 After I got them all filed down and figured out how to hinge them, I spray-painted them gold and glued pearls into the hinges and blue glass beads into the buttons:


 Finally, today, I got them all finished. I can’t wait to get them on the sleeves. However, the sleeves are going to be heavy!!
The Kirtle and Gown are also in full swing now.
Here is the progress on the gown:

 The trim and skirt are just pinned on. I’m planning on putting the trim across the top of the bodice, down the front, and around the bottom. The skirt still needs to be attached, but I was too excited to start on the Gown, so the skirt attachment will have to wait.
And here is the trim for the kirtle:

I bought some embroidered fabric and used fusible interfacing to give it some body. I then cut it into strips and am couching gold thread onto the base fabric. It goes pretty quickly, so I think I will be able to get it finished. The good news is that I can couch it sewn onto the dress if I run out of time.
The Gown is in progress also. Here it is on my dressform, but it looks sort of like a shroud because it doesn’t have any trim yet and isn’t sewn together except for the major seams.

 The gown drapes very well and the velveteen is beautiful. This is going to be stupidly hot to wear but once I get it done, I don’t think I’m going to want to take it off!! 😀
") The sleeves are all trimmed out. I now have to sew them together with the hinges. There will be about 7 hinges down each pane. I cannot wait to get these done and see how they look. I feel like I’ve been working up to this construction forever. All the pieces are finally ready, now I just have to sit and sew!!
The sleeves are all trimmed out. I now have to sew them together with the hinges. There will be about 7 hinges down each pane. I cannot wait to get these done and see how they look. I feel like I’ve been working up to this construction forever. All the pieces are finally ready, now I just have to sit and sew!!
I’m really happy with the trim, I think it does a good job emulating the trim on the inspiration dress. I am machine sewing it because I figure about 50 yards will go into the dress and I don’t have the patience to hand sew all that.
Partlet and Camica:

I was feeling pretty good about the progress of everything when I realized that I want to wear this in 30 days and I didn’t have anything to wear under it!! This meant an emergency trip to Joann’s (Are there any other kind??)
Camica and Partlet
I bought a linen/cotton blend for the Camica and am planning on using the pattern from Festive Attyre http://www.festiveattyre.com/research/chemise.html I also bought some lovely cotton lace to use on the edge of the neck and sleeves. I don’t have any pictures because the fabric and trim are currently in the wash!
The partlet was supposed to be Lacis or Drawn Threadwork or Mezzo Mandolina or something really complicated. If you are noticing the looming deadline, I went with a stopgap measure. I bought some lace/tulle bridally stuff and some tiny lace. Anyway, whatever the fiber content 🙂 this will be quick to make and I can make the really fancy one when I have more time. You can never have too many partlets!!
More pictures to come when more progress happens!
Finished!
So the dress diary lost cohesion as the completion deadline started looming. Here is the rundown of what happened in the intervening time from the above post to the end.
Sewing the little hinges on the sleeves took WAAAY longer than expected. There were a million of them and each on had to be attached in six places. Okay, there were 27 on each sleeve, but I promise that when you are sewing them on it feels like a million. I made it through all the Star Wars movies during the sewing, even the kinda painful prequels, which weren’t quite as painful on second viewing due to my extremely lowered expectations.
Sewing the trim on also took forever, at last count there was about 150 yards of trim on the outfit. I did it all with the machine (SCA purists should not read this part) but otherwise I never would have finished it. For the kirtle trim, I decided it needed some pearls to cover up the areas where the couching met itself even though it wasn’t on the original dress. I figured that Eleanora wouldn’t mind extra pearls.
Anyway, here are the pictures;

Sleeve in Progress

Camica


Camica and partlet.

Eleanora with purple pearl partlet
The next few pictures are really washed out because we were taking them in the kitchen on a really sunny morning. I couldn’t tell they were washed out until after I had taken the whole outfit off.

Partlet close-up

Kirtle side with the back bustled up so the train will not show under the gown. I considered making an actual French bustle but then decided that five straight pins work just as well and are less permanent

Bustle Back

Kirtle Train unbustled...it is totally impractical, I know, but it is really fun, also, this whole outfit is entirely impractical!

Everything finally goes together! The plastic cooler is in the back to add that Italian Ren ambiance!

Eleanora Pose


Back
I’m entering this outfit in the Dragon*Con Technical Costume Contest. I should get some pretty good pictures from that, so I will update then.