
Once I found a little more info concerning Gefrens, I was excited to get to work. I dug through my workroom to find some yarn I had stashed from my failed attempts at crocheting (if anyone is willing to try and teach me again I would gladly offer up a homemade cake or some cupcakes to do so). I managed to find some random yarn in a color I wasn’t immediately attached to and wouldn’t mind practicing with.

Ta-da! Not a color I would wear personally, but it served its purpose for my experimentation.
Okay, so it’s not all that exciting, but not bad for my first attempt. Unfortunately, I did not think to take pics of its progress as I was working on it, but I’ll make up for that in a few moments with pics I DID remember to take and try and explain what I did along the way. For the above result, I did a lot of guessing with measurements. For the ties, I decided to use three strands braided for the core of the Gefrens, as I thought it would make it a bit more sturdy than a singular strand. The length for my initial attempt ended up being a bit too short when braided and done.
From http://www.bettinas-pages.de/clothing/c_wulsthaube.php again, she cites that the Gefrens was most likely made from yarn, either wool or silk and seemed to hang no lower than the back of the neck. She also goes on to say that they are usually one singular color, but there are pictures of them in multiple colors as well.
So, for my next attempt (and version I intended on wearing for our Newcomer’s Taking Flight event on April 28th, 2018) I purchased some soft purple yarn from JoAnn’s. I’ve had some part of my hair dyed purple for a few years now, and I change it up a bit every few months or so. When I first started down this late period German road, the hair underneath (and at the back of my head) happened to be purple at the time. I figured it was only natural to make my next one in the same color.
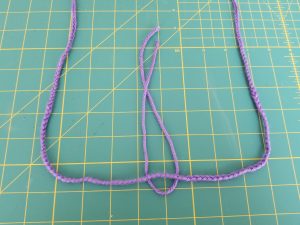
First, I cut three stands a yard each and made a braid for the core band. While that length ends up working just fine for my purposes, I will most likely make the next one a bit longer. I am able to tie it off with a bow, but a rather small one for my liking, so I think some additional length is in order for the next one.
I took a measurement from the base of my skull to the bottom of my neck to cut the lengths of yarn for the fringe. I ended up with roughly 6″, so I doubled it to 12′ since I’d have to loop it around the cord.
Found the center point and looped the first fringe.
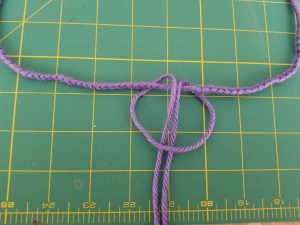
The first loop.
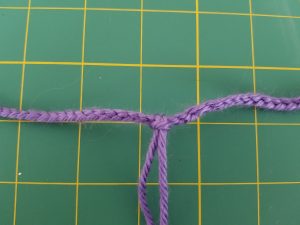
Knotted snugly against the cord.
I’ve lost count of how many fringe cords I put on the Gefrens, but I can tell you my initial plan was to have enough to go from behind one ear to the other, however many that may take. I imagine that the thickness of the yarn used will have some effect on how many you end up needing. Either way, I don’t think there’s a set amount used, it’s what you end up using to get the effect you desire.

My finished Gefrens. I did a small amount of trimming to try and keep the lengths of the fringe as uniform as I could. On the left you can see a glimpse of my gown I intended to wear it with.
I was happy with the final result, and I even have a few notes to remember for any future incarnations I choose to make. I’m a big fan of accessories in general, and especially anything that’s unique or visually interesting makes them even more fun.
I hope this mini tute was helpful and that you, the reader, are inspired to take a closer look at your own persona to find something new or interesting to add to it. Accessories always complete any already great outfit!