
I needed to make a new belt to go with the Alborghetti suit, so I found a new type of belt hardware to play with. Serafina came down today to work on some of her casting, so I cranked out a quick mold that I thought might do the trick. The extant piece I’m emulating has a lion face, with a perpendicular loop on one side for the belt hook and a wide rectangular loop on the other for the belt. Rather than make two molds for the two different belt loops, I tried to make a single mold that could be turned into either one. The owl face is from the household badge.
Month: December 2011
Pattern Organization
When I started this project, I wanted to make sure I was able to keep track of all the pattern pieces that I would be making. I labeled a gallon ziploc bag and put each piece in it as I finished with it. Sometimes I had to get the pieces out and put them back in several times, but I made sure they always went back in. At one point I wanted to go back and copy the codpiece pattern I used for the Bronzino doublet. Rather then dig through the overflowing pattern drawer (where everything was shoved willy-nilly), I took the drawer out, purged all the old patterns, and bagged up everything that I wanted to keep. The result is a much neater and more useful system:

Alborghetti Suit: Pretty Much Done
The suit is pretty much done now. I still need to make some black stockings, maybe a new hat, a new belt, add a couple more buttons on the cuffs, and fix one of the shirt cuff toggles. It is done enough to take some pictures though, so here they are. The belt is too short, so it makes some unnecessary wrinkles at the waist. The trunk hose sit just a touch lower than I’d like, but that’s minor quibble. It’s all extremely comfortable, and I can sit with zero difficulty. All in all, I’m pleased.
Alborghetti Suit: Codpiece
The codpiece is made and installed. The main part of the codpiece is a single layer of wool with no interlining, stuffed with strips cut from a failed linen sleeve lining. The base is one layer of the heavy wool and a lining of white linen. The edge binding and racing stripe are velveteen.
I sewed the center seam on the machine, then turned t and basted it to the wool base. I sewed around the base of the stuffed portion, leaving an open section on one side to put the stuffing in. Once it was stuffed, I closed up the hole and sewed the trim on. Next came the binding in the usual manner. I did it in two pieces only because that’s what was demanded by the length of scraps I had on hand. At this point I sewed five pairs of hooks and eyes (alternating) on the center front opening of the trunk hose. The point of the codpiece was sewn in at the bottom of the opening; each side was only sewn on for about 2″. Eyelets in the codpiece and trunk hose finished the process.
Alborghetti Suit: More Trunk Hose Construction
The trunk hose are nearly complete now. All that remains is binding one of the canions, adding hooks and eyes at the center front opening, and building the codpiece.
Alborghetti Suit: Pocket
As promised, here’s the step-by-step for installing the pocket. To refresh your memory on what the pocket is supposed to look like, you can refer back to the portrait.
First we start off with the interlining for the “poof”. I cut it from the last of the wool that I’ve used for years and years for this sort of thing. It provides body and springiness and I’ll miss it terribly. There wasn’t enough of it left by this point to get the whole thing out of one piece. Instead of trying to piece in scraps of the same stuff (which would make really bulky seams) I finished the ends off with some cotton I’ve been using for patterning. Conveniently enough, this will help reduce bulk at the inner leg, which is always a good thing in these situations. The poof was patterned based on the trunk hose pattern, with the pieces spread apart. I eyeballed a lot of lengths and had to make a few changes along the way, but it seems to have turned out okay.
Alborghetti Suit: Trunk Hose and Buttons
I’ve made some progress on various bits, but the age old dilemma of the black suit means that the details are hard to make out.

One side of the trunk hose "poof" is in the process of being attached. You can't really see it, but the pocket was installed before attaching the poof to the foundation. There will be an entire post on the pocket later.

The buttons from my old black suit have been moved to the new doublet.

The little silver beads at the top of the buttons have been replaced with little black beads.
Alborghetti Suit: Buttonholes
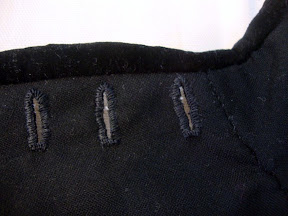 The buttonholes on the front of the doublet are done. I wish my hand would quit falling asleep while I’m sewing!
Alborghetti Suit: Sleeves
Both sleeves are on the doublet now. Here’ some pictures of the sleeve installation process:

The wool and linen lining are sewn together by machine and turned through the wrist end. The edges are pressed and the seam whip stitched together. Here the wool has been sewn; later the linen will be sewn with another, looser whip stitch. There is an opening left at the wrist and at the shoulder, where the gusset will be inserted.
The shoulder wing has been basted into the top of the armscye.

The sleeve is sewn into the armscye, starting from the shoulder seam on the doublet. The wing is included in this seam.

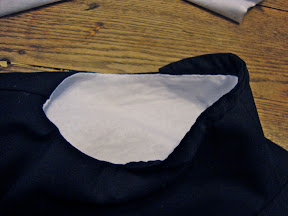
The finished sleeve seam, with a triangular gap that will be filled with a gusset.
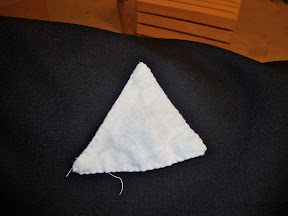
A scrap of wool is placed over the hole. The edges are traced with chalk, brass rubbing style. An arrow shows which side will attach to the armscye.
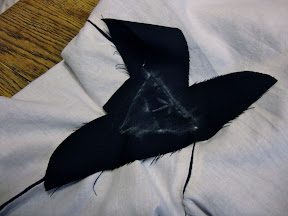
The wool is trimmed, and the first corner is turned under for basting.

The edges of the gusset are turned and basted in place, turning in each corner as it is reached.

All edges are basted.

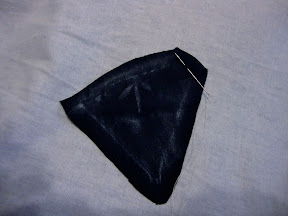
A scrap of linen is pinned in the middle of the gusset and trimmed to shape.

The edges of the linen are turned under and pinned in place.
The linen lining is sewn in place.
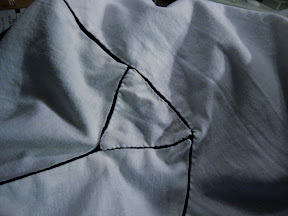
The gusset is installed!
Alborghetti Suit: More Recycling
I dismantled the sleeves tonight and cut the wool up for the trunk hose canions. The canions are now covered, with hardly any waste. Not a lot of progress, but better than nothing.