
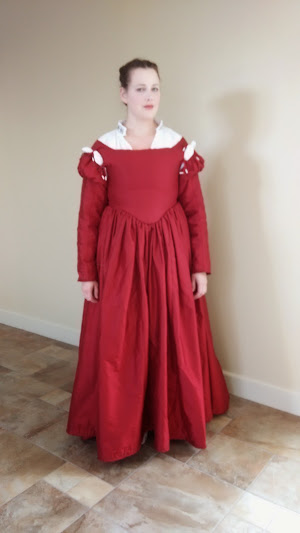

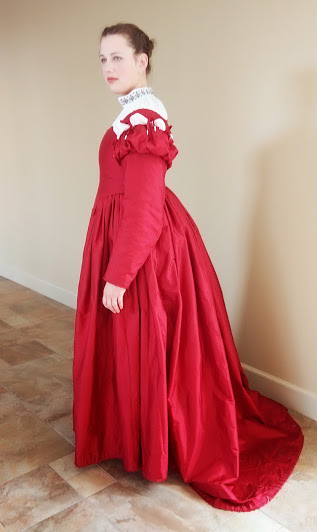
DESCRIPTION OF ITEM AND HISTORICAL BACKGROUND
The sottana,[1] also known as a petticoat with attached imbusto (bodice), was a mainstay of fashion in 16th century Florence. It was sometimes worn as a standalone garment and sometimes underneath other clothing[2]. It could be worn with or without sleeves, as dictated by the temperature or the other layers with which it was worn. “Between the 1540s and 60s, corresponding to the period in which the costumes of the Duchess Eleanora are registered, the petticoat… took on the appearance of an independent garment, frequently provided with train, particularly elaborate in terms of both decorations and materials.” [3] Women of all stations wore similar garments, though there are many variations due to value of construction materials. It was a staple of the 16th century Florentine woman, able to be dressed up or down based on the status of the wearer or occasion.
Figure 1 Petticoat worn with detachable sleeves. Angelo Bronzino, Eleonora of Toldeo, c, 1543. Prague, Narondni Galerie.
Figure 2 Yellow sottana worn with red zimarra Agnolo Bronzino, Eleonora of Toledo?, detail c.1550, Turin, Galeria Sabauda.

Figure 3 Golden sottana under red veste. Giovani Batista Moroni, Lady in Red, c. 1556-60, National Gallery, London
The components of the sottana were a bodice (imbusto) sewn to a skirt (falda) and sleeves. The bodice could be laced through eyelets on the sides or the front.[4] The skirt could be made with or without a train. There are some portraits that suggest set-in sleeves[5], but many are detached from the gown. The sleeves could be “attached at the moment of dressing by means of laces or ribbons”[6] or with decorative buttons. [7] Sleeveless gowns were also worn, evidenced by “several sleeveless petticoats in [Eleanora’s] wardrobe.”[8] Her burial gown may have been a sleeveless petticoat as there is no remaining evidence that sleeves were attached to her gown.[9]
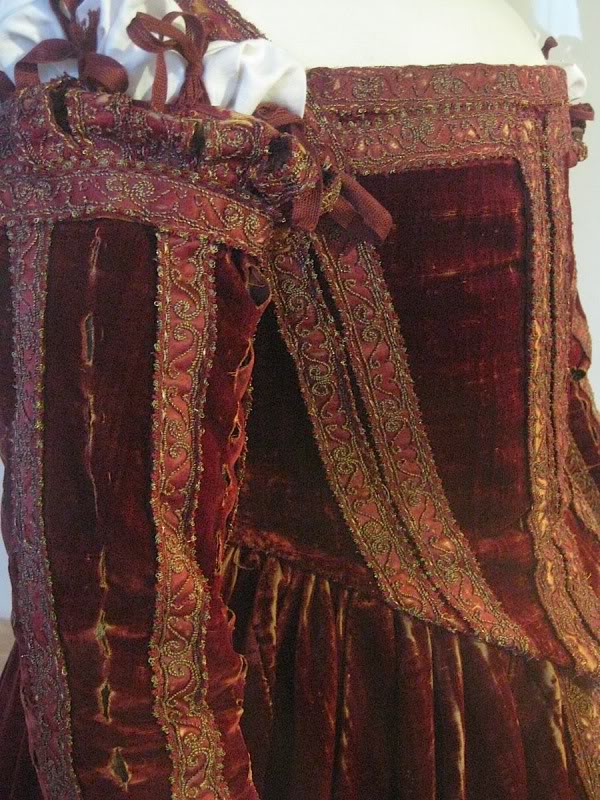
Figure 4 Detail of sleeves attached with ribbons. Petticoat with sleeves, c. 1560, Pisa, Museo di Palazzo Reale.
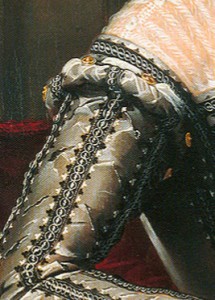
Figure 5 Detail of sleeve attached to a grey petticoat. Jacopo Zucchi, Portrait of a Woman, c.1560-65, Florence Metropolitan Museum of Art, New York City
MATERIALS AND TOOLS
The tools used in period to make the sottana included scissors, needles, pins, thimble, and chalk (use to marking the fabric for cutting) along with beeswax for strengthening the thread. The tools I used were modern sewing needles, pins, scissors, aglet crimpers, beeswax, silk and cotton thread. I did not use a thimble, due to lack of one that fit.
“Between 1544 and 1562 there are records of at least 90 petticoats made for Eleonora di Toledo.” [10] Materials used for these gowns were varied and included: silks in the form of: taffeta of different weights, satin, damask, and velvet; cloths of gold and silver, and wool.[11] Period construction included layers of fabric inside the bodice for support. Landini notes, “The padding of the garment was obtained by an internal layering of fabrics, the doppia, made up of a felt and two types of cloth, one stiffened, the other finer.” [12] Eleanora’s gown had remnants of a linen lining, but there are no stiffening materials remaining save in the hem, which is stiffened with wool. [13] The predominant gown colors were shades of red, but other colors included grey, brown, incarnate (flesh tone), purplish violet, white, sky blue, yellow, green mauve, aquamarine, and gilt. [14]
Part of my personal challenge in making this dress was not buying any materials and using up my stash of supplies as much as possible. Consequently, I used: smooth silk dupioni, linen, wool, silk and cotton thread, glue, pearls, and gold headpins. The smooth silk may or may not be period, but it was more affordable than taffeta. I did purchase the cotton tatting thread used to weave the laces. I wanted to use silk for the laces (as was used for the ties on Eleonora’s gown), but what I had in my stash was the wrong red and I found this cotton that was nearly a perfect match.
PROCESSES
The overall patterning for this dress is similar to that of Eleanora’s burial gown which has been diagramed by Janet Arnold. Eleanora’s gown featured a skirt of rectangles and gores, shaped at the waist to fit the bodice with pleats. The bodice was without allowance for the bust with wide set shoulders and laced on the side back. The eyelets were worked through the embroidered guards on the back which may indicate that the bodice was taken in. The hem was faced in matching fabric cut on the bias and bits of wool remain inside the facing. The skirt opening was bound in bias cut strips of matching fabric.
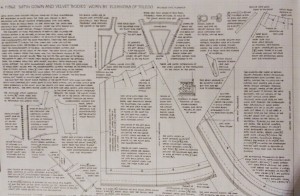
Figure 6 Diagram of Eleonora of Toledo’s burial gown, Janet Arnold, Patterns of Fashion, pg. 104
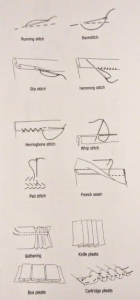
Figure 7: Period stitch techniques. Mikhaila, Ninya, and Jane Davies. The Tudor Tailor: Reconstructing 16th-century Dress. Hollywood, CA: Costume and Fashion Press, 2006.
Construction of this sottana happened in two parts: the first approximately 7 years ago, before I joined the SCA, and the second in April 2015. Originally the dress was to be a recreation of the sottana in Figure 1, including a similar trim design. While the embroidery was in progress, supplier for the silk thread I had been using discontinued it. Thus I was unable to finish the sottana with the intended embroidery, but I had nearly finished the skirt.[20] At this point, the project was abandoned for 7 years. In March 2015, I rediscovered the nearly complete skirt and remaining fabric. At the same time, I stumbled upon new inspiration[21] and reworked the project to its current form.A variety of stitches were used to construct period clothing. The remains of Eleonora’s burial gown are much degraded and not much stitching remains. Janet Arnold notes, “Small stitch holes where the skirt was attached,”[16] as well as . According to The Tudor Tailor, the following are some of the construction stitches used in the 16th century: running, backstitch, slip, hemming, whip, pad, French seams, and cartridge pleats. [17] In addition to these, Mathew Gnagy has noted the use of prick stitch, a modified back stitch, in his observations of extant garments. [19]
The original skirt was constructed of panels and gores similar to those pictured in Figure 5, however it has three additional panels, one in the front, two in the back, and the gores are slightly different. This is because at the time I had not developed an eye for 16th century aesthetics and I thought I needed the dress to be fuller. It also originally had a 4 foot train, but most of that has been removed because I find a train of that length inconvenient to wear. I used French seams, to prevent fraying, done with running stitch in silk thread.
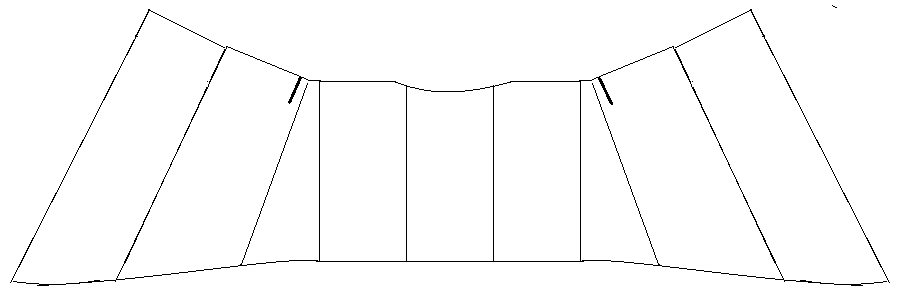
Figure 8: Approximate layout of skirt. Not to scale
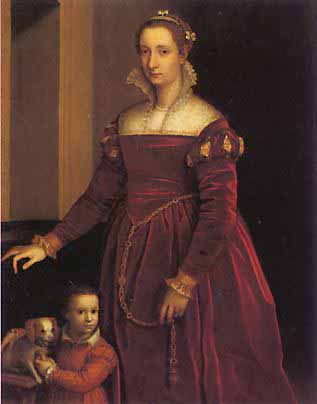
Figure 9 Inspiration portrait. Sofonisba Anguissola, Double Portrait of a Lady and her Daughter, n.d., National Museum of Women in the Arts, Washington, D.C.
With the new inspiration portrait, I was especially enamored with the lack of trim, and obvious wrinkling at the bust and waist. In Eleanora’s wardrobe accounts, there is no evidence of any corsets, and the wrinkling in this portrait lends its self to the idea that there may not have been corsets worn with this dress type. I also liked the less structured type of gathering used for the skirt attachment. I chose to do a different sleeve as I have already made a panned sleeve and wanted to learn other techniques. The inspiration for the sleeve head was found in gown of the child in the same painting. I chose to do detachable sleeves for versatility in seasonal wear.
The sleeves were constructed in 5 pieces: front and back of arm, the puffed sleeve head, and two bias strips. Each piece is cut from the red silk, interlined heavy black linen and lined with lighter weight black linen, excepting the sleeve head which is unlined. The main seams are done using waxed cotton thread and carried out in back stitch. The seams are pressed open and I use prick stitch to reinforce as well as lend slight decorative aspect to the seams. Bias strips were cut and applied to the sleeve at the bottom of the head before attaching the puff and then to the top before closing the lining for decorative effect as is seen in figure 10 The puff was gathered, then sewn to the unlined sleeve using a combination of back stitch and running stitch. The bias strip was applied at the cuff and the lining sewn in. At that point, the bias strips were snipped at regular intervals in the same manner as the edging at the neck in Figure 1. Finally, using detached buttonhole stitch, I created the loops for attaching the sleeves.[22]
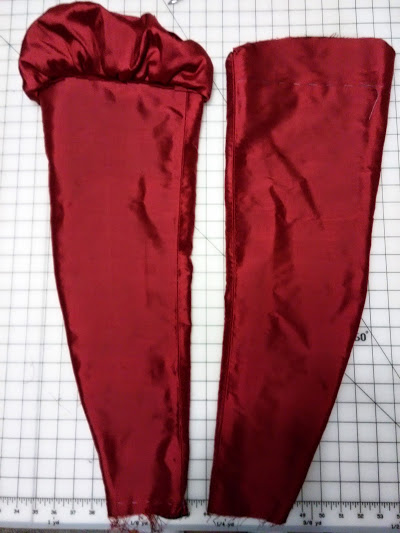
Figure 11 Sleeves before and after Puff is sewn on.
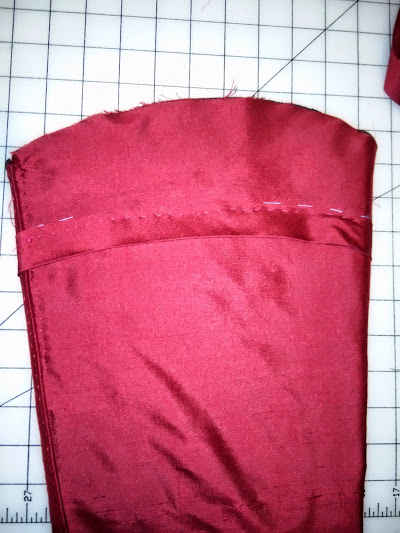
Figure 12: Bias strip applied.
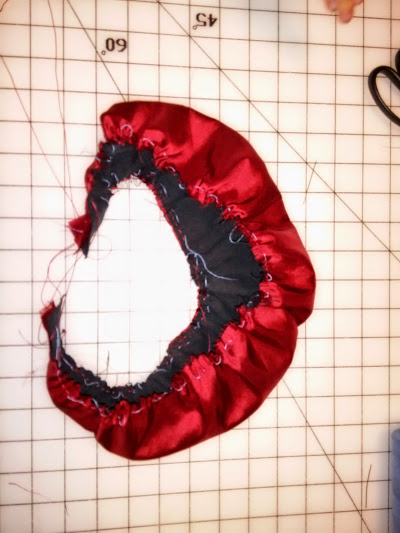
Figure 13: Sleeve head puff gathered, unattached.
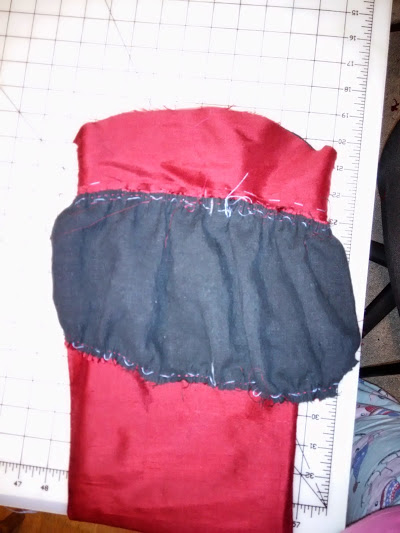
Figure 14 Puff sewn in place overlapping the bias strip already in place.
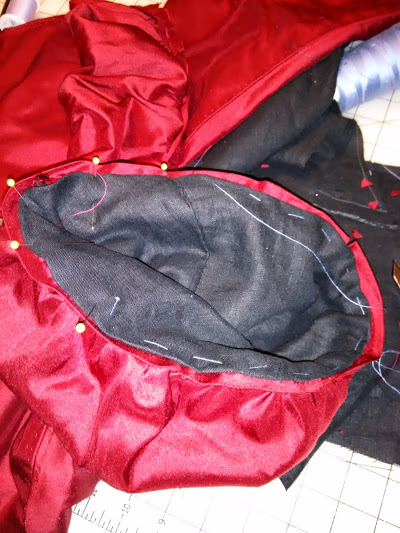
Figure 15 Lining in process of being sewn in after application of top edge bias strip.
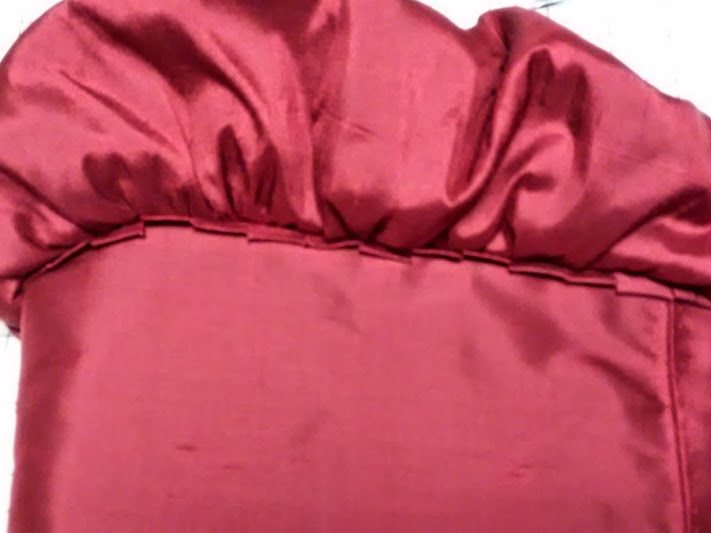
Figure 16 Finished sleeve head with bias strips clipped.
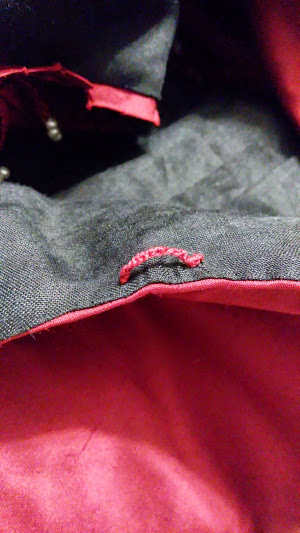
Figure 17 . Detached buttonhole stitch loop.
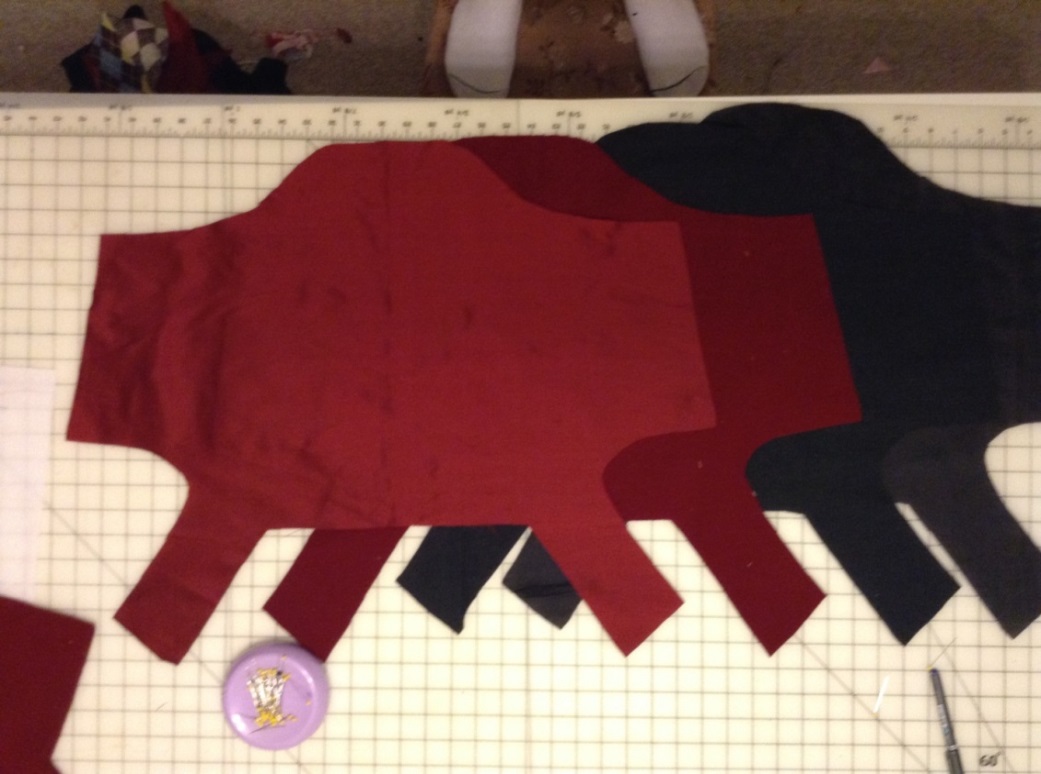
Figure 18. Layers of the bodice. Only front pieces pictured.
Care was taken to avoid putting the glue places that would have eyelets sewn and on the shoulders where flexibility would be needed. In a previous dress, I stiffened the linen before stitching it to the wool. This was a mistake and required that I use a machine to stitch through the layers.The bodice was stiffened by two layers of padded linen hardened with (probably animal) glue placed between the outer fabric and the taffeta lining, and it had a wide, square neckline typical of Italian Renaissance dresses. The bodice consists of the following layers: lightweight black linen, heavier black linen, red wool, and red silk.[23] To give the bodice more stiffness, the red wool and heavy linen is pad stitched together.[24] While I do not have evidence for pad stitching interlinings on a sottana, it was commonly used for structure in men’s doublets, and was used in the yoke of a woman’s loose gown. [25] After pad stitching I painted the area to be stiffened with fabric glue.[26] When discussing the funeral dress of Giulia Varano of Urbino , Anea Arnesen provided her own translation of I della Rovere, which states:
“The bodice was stiffened by two layers of padded linen hardened with (probably animal) glue placed between the outer fabric and the taffeta lining, and it had a wide, square neckline typical of Italian Renaissance dresses.” [27]
Care was taken to avoid putting the glue places that would have eyelets sewn and on the shoulders where flexibility would be needed. In a previous dress, I stiffened the linen before stitching it to the wool. This was a mistake and required that I use a machine to stitch through the layers.
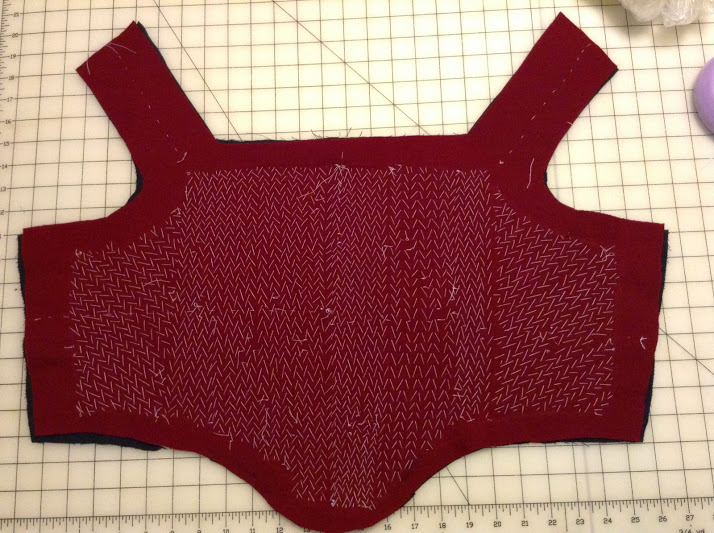
Figure 19 Pad stitching completed
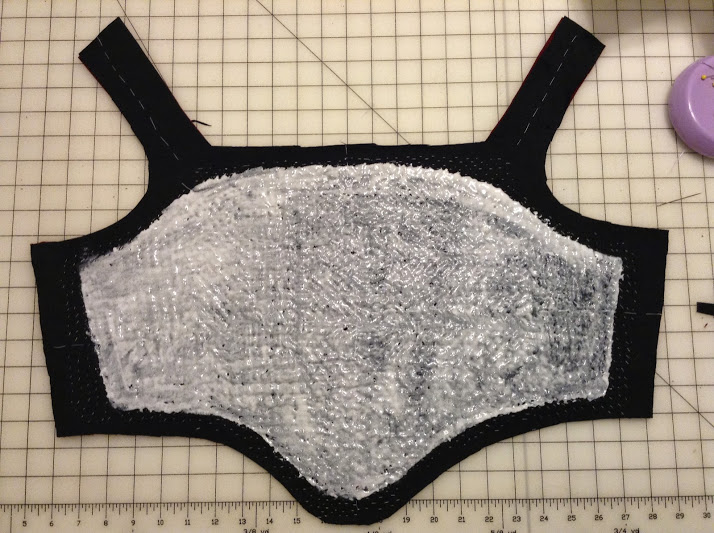
Figure 20 Glue applied on linen over the area previously pad stitched
At this point the seam allowance was trimmed and the silk outer fabric wrapped around the inner layers. It was sewn to the interlining using backstitch. Seam allowances were clipped as necessary. The back of the bodice was constructed the same as the front, but without the pad stitching and glue. The front and back were attached at the strap edges with whip stitch. The straps are at a slightlydifferent angle than the burial gown because I am different in shape than Eleonora. I took into account the shapes of her dress and how similar sottane are represented in paintings when creating this and patterned the straps to sit in the appropriate place on my shoulders. A strip of bias was sewn to the neckline and then the lining attached with slip stitch in the same manner as with the sleeves. At this point the bias strip was snipped. Eyelets were sewn into the back side openings using whip stitch in the same cotton that was used for the laces. Using detached buttonhole stitch, the matching lacing points were sewn on the straps for attaching the sleeves.
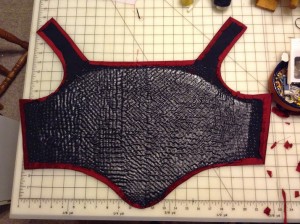
Figure 21 Silk wrapped around interlining and backstitched in place.
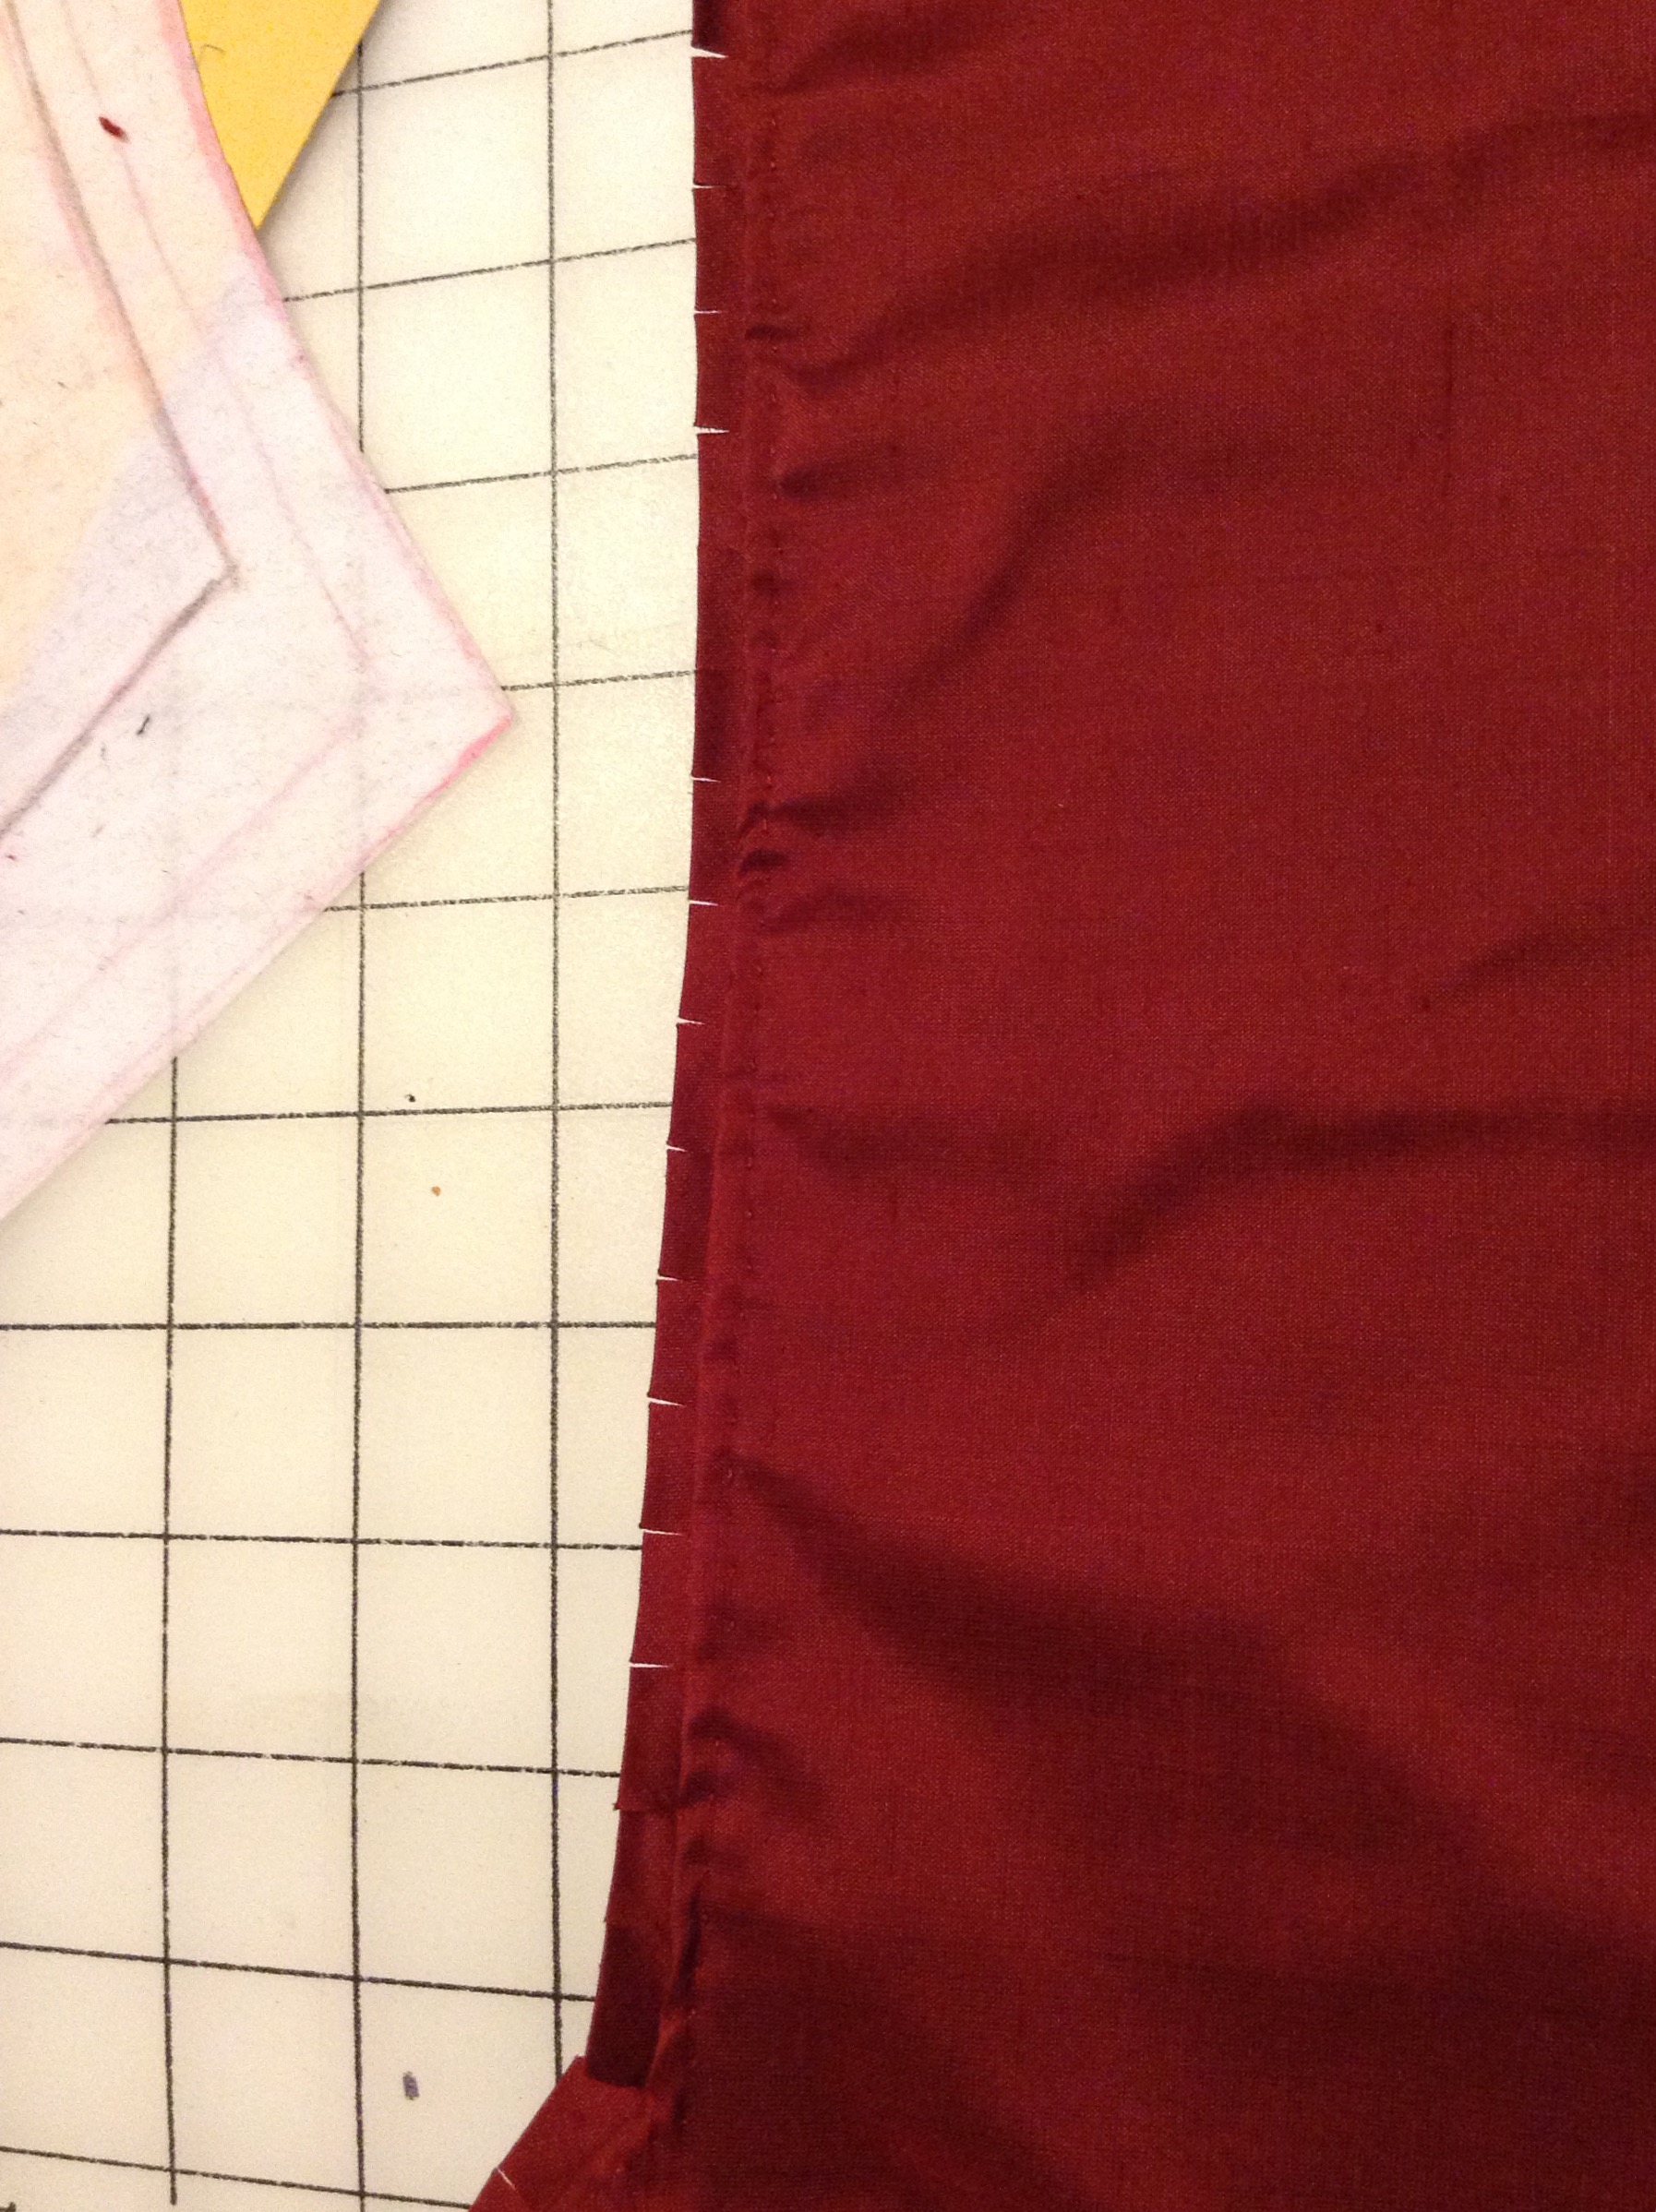
Figure 22 Bias applied and clipped
Openings were cut into the skirt top and edged in bias strips to create an underlap, like Eleonora’s burial gown. The top of the skirt was shaped to match the curve of the bottom edge of the bodice, the top turned over and a long running stitch is used to gather it into cartridge pleats. After using whip stitch to attach the skirt to the bodice, I removed the gathering thread. This created the look of the gathered skirt in the portrait. The hem was faced in bias cut silk that was wrapped around wool felt and then .[28] A tuck was then sewn around the circumference of the skirt using running stitch. This tuck can be seen in the burial gown and an extant gown in Pisa.[29] While historians can only conjecture at its purpose, from personal experience I have learned that it helps hold the skirts out a bit and makes walking easier.

Figure 24 Hem tuck and clipped facing as seen from front.
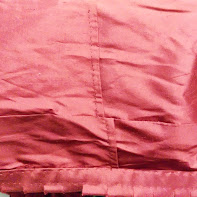
Figure 25 Hem tuck and clipped facing as seen from inside of skirt.
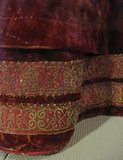
Figure 26 Detail of Hem tuck of petticoat in figure 4.
The bodice laces and ties for the sleeves were woven using a rigid heddle technique in red cotton. Aglets for the bodice laces were made of crimped brass, similar to the conical shaped aglets in 16th century. The aglets for the sleeves were inspired by those in Figure23 and are made with a gold head pin and 3 natural pearls. [30]
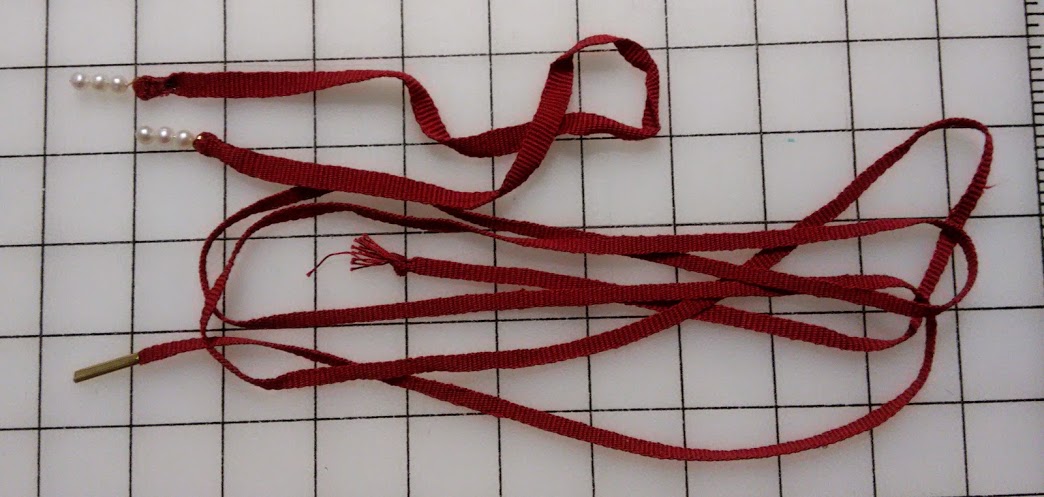
Figure 24 Warp faced laces with aglets.
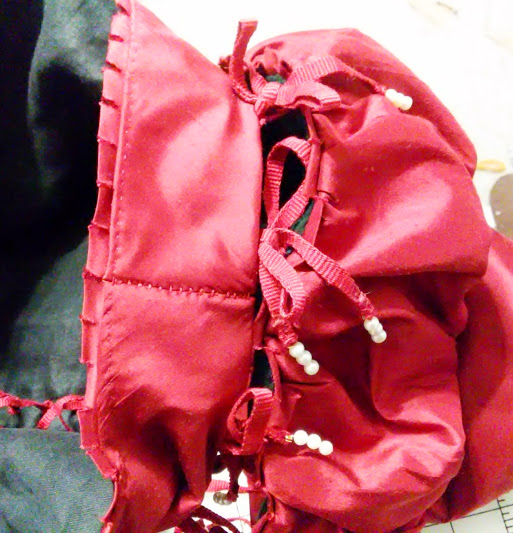
Figure 25 Sleeves tied in.

Figure 26 A bundle of laces with gilded brass points (aglets). C. 1600-1603 © The royal Armoury, Stockhom, photo Goran Schmidt.
LESSONS AND FUTURE CHANGES
This is my second time experimenting with glued and pad-stitched bodices. The first time I sewed the layers together with straight lines using a machine. This time I did the pad stitching first. I wasn’t prepared for the glue to create a puckered texture. In my next experiment I want to try using a stiffened piece of linen that is separate from the pad-stitched layer.
Since the original construction of the skirt, I have learned more and would not add the extra panels in the front, but for this project I did not see the point in undoing good handwork.
In creating this dress, and its predecessors, I have learned how comfortable late period clothing can be and have been surprised that the proper silhouette of 16th century Florence can be achieved without a corset. In my experience, the higher cut waist lends its self well to pregnancy up until the end of the second trimester of pregnancy as well.
REFERENCES
Primary Sources
Satin Gown worn by Eleanora of Toledo, c. 1562 Palazo Pitti, Florence.
Petticoat with sleeves, c. 1560, Pisa, Museo di Palazzo Reale. Retrieved May 17, 2015, from http://aneafiles.webs.com/renaissancegallery/stays.html
Laces with points, c 1600-1603 ( inventory no. 3361-19840),The Royal Armoury, Stockholm, photo Goran Schmidt.
Secondary Sources
Agnolo Bronzino, Eleonora of Toldeo, c, 1543. Prague, Narondni Galerie. Accessed May 17, 2015, from http://starlightmasquerade.com/PortraitGallery/Florentine/Florentine3.htm
Agnolo Bronzino, Eleonora of Toledo?, detail c.1550, Turin, Galeria Sabauda. Accessed May 17, 2015, from http://www.wikiart.org/en/agnolo-bronzino/portrait-of-eleonora-da-toledo
Giovani Batista Moroni, Lady in Red, c. 1556-60, National Gallery, London. Accessed May 17, 2015, from http://katerina.purplefiles.net/DOCO/dressing%20insideout.htm
Jacopo Zucchi, Portrait of a Woman, c.1560-65, Florence Metropolitan Museum of Art, New York CityAccessed May 17, 2015, from http://starlightmasquerade.com/PortraitGallery/Florentine/Florentine2.htm
Sofonisba Anguissola, Double Portrait of a Lady and her Daughter, n.d., National Museum of Women in the Arts, Washington, D.C.. Accessed May 17, 2015, from http://clara.nmwa.org/index.php?g=detail&object_id=2050
Tertiary Sources
Arnesen, Anea, Extant Italian dresses. (n.d.). Accessed May 17, 2015, from http://aneafiles.webs.com/renaissancegallery/extant.html
Arnold, Janet. Patterns of Fashion: The Cut and Construction of Clothes for Men and Women, C1560-1620. London: Macmillan ;, 1985.
Gnagy, Mathew. The Modern Maker. 2014
Landini, Roberta, and Bruna Niccoli. Moda a Firenze, 1540-1580: Lo Stile Di Eleonora Di Toledo E La Sua Influenza. Firenze: Pagliai Polistampa, 2005.
Mikhaila, Ninya, and Jane Davies. The Tudor Tailor: Reconstructing 16th-century Dress. Hollywood, Calif.: Costume and Fashion Press, 2006.
Footnotes:
[1] Italain dress terminology taken from Roberta Orsi Landini – Bruna Niccoli, Moda a Firenze 1540-1580 : Lo stile di Eleonora di Toledo e la sua influenza. (Pagliai Polistampa, 2005), 249-252.
[2] See Figures 1-3 for examples.
[3] Landini, 77.
[4] Idem, 82 ,132. Shows lower class front lacing gowns in lesser textiles.
[5] See figure 9 for example.
[6]Landini, 79.
[7] See figures 4-5 for examples
[8]Idem, 83.
[9] Arnold, Janet. Patterns of Fashion: The Cut and Construction of Clothes for Men and Women, c. 1560-1620. London: Macmillan, 1985, 103
[10]Landini, 88.
[11]Idem, 88.
[12]Idem, 84.
[13]Arnold, 104
[14]Landini, 88-89.
[15] Arnold, 104 See Figure 6.
[16] Arnold, 103
[17] Ninya Mikhaila, Jane Malcolm-Davies, The Tudor Tailor (QSM,2006), 53. Also see Figure 6.
[18] Mathew Gnagy, The Modern Maker Vol. 1: Men’s Doublets. ( Mathew Gnagy, 2014), 55
[19] Note: At each step in construction process, the pieces were first basted before stitching in earnest. This was done in contrasting thread for easier removal. Some basting stitches are visible in the given pictures.
[20] Sadly, I did not document the earlier construction process, thus I do not have pictures of the making of the skirt. See figure 8 for approximate skirt layout.
[21] See Figure 9.
[22] See Figures 11- 17
[23] See Figure 18.
[24] See http://www.dellacivetta.org/alessandra/class-handouts/bodice-whipper/ for additional information construction and stitching techniques used . Also see figure 19.
[25] Arnold, 28,118
[26] See figure 20.
[27] Arnesen, Renaissance stays. (n.d.). Retrieved May 18, 2015, from http://aneafiles.webs.com/renaissancegallery/stays.html
[28] See figure 6, 24, and 25.
[29] Arnold, 104. Also see figure 26.
[30] See figures 24-26
Thank you for your documentation. I have had problems in this area. I am working on a green 1560 toledo style.
I am happy to answer any questions if I can!